Share Items
Sharing requires membership in an organization. Using Bitwarden, sharing an item means two things:
Adding the item to an organization. This transfers ownership of the item to the organization you're sharing it with.
Adding the item to one or more collections. The Access settings set on those collections determine who will have access to it.
There are lots of different methods for sharing items using Bitwarden. In this article, we'll walk through those methods. Whichever method works best for your workflow, remember that you'll need to be a member of an organization in order to share.
Whether you're Adding items to your organization or Importing items to your organization, you can specify who they should be shared with right from the start. You can add or import items to any collection that you have the right permissions for:
To add a new shared item from the web app, browser extension, mobile, or desktop:
On the Vault view of any Bitwarden app, select the New button and select the desired item type.
tip
Organization owners, admins, and some custom users can also take this step directly from the Admin Console to skip some of the steps in this process.
Using the Owner dropdown, choose the organization you want this item to be owned by.
Using the Collections dropdown, choose the collection(s) to share this item with. The Access settings set on those collections determine who will have access to it.
Fill in the rest of the relevant information for the item and select Save to complete sharing.
note
Reminder: Sharing an item involves giving ownership of it to the organization. Permissions for a collection should be well managed by the administrative team because members with the right level of permission have the ability to alter or delete a shared item. You can tell that an item is shared by the badge next to its name:

You might find that an item currently owned by you needs to be shared with other members of your organization. Items can be shared with any collection that you have the right permissions for, from any Bitwarden app:
The most universal method for sharing existing items using the web app can be used to share items that will be brand new to your organization, or to simply add more collections to the list it's shared with:
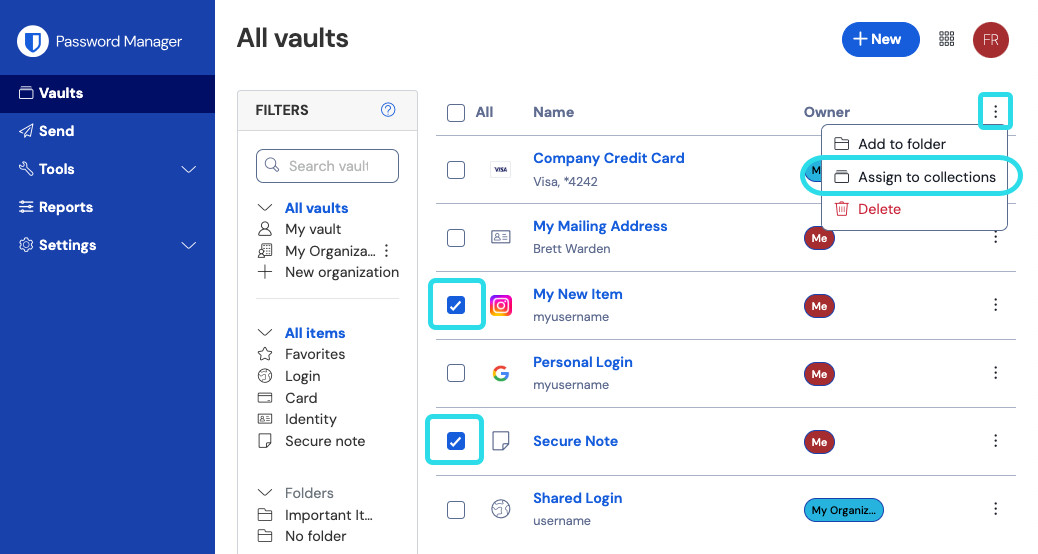
In the Vaults view, select the item(s) to share using the checkbox(es).
tip
Organization owners, admins, and some custom users can also take this step directly from the Admin Console to skip some of the steps in this process.
Using the options menu, select the Assign to collections option:
Assign to collections On the Assign to collections pop-up:
Use the Move to organization dropdown to choose the organization you want this item to be owned by.
Use the Select collections to assign dropdown to choose the collection(s) to share this item with. The Access settings set on those collections determine who will have access to it.
Select Assign to complete sharing.

More methods for sharing
The previously described method is the most universal and simplified, however there are a few other methods for sharing you may have access to:
Share from the Admin Console: As mentioned previously, organization owners, admins, and some custom users can streamline sharing by doing so directly from the Admin Console:

Assign to collections in bulk Edit an item directly: If you need to make changes to an individual item prior to sharing it, open the item and, in the Edit view, use the Owner and Collections dropdowns to choose who to share it with while you're making the necessary changes:

Change item ownership


note
Reminder: Sharing an item involves giving ownership of it to the organization. Permissions for a collection should be well managed by the administrative team because members with the right level of permission have the ability to alter or delete a shared item. You can tell that an item is shared by the badge next to its name:
Users with the Manage collection permission for the collection(s) an item is stored in can choose to stop sharing an item with an organization:
Clone the item by using the options menu for the item and selecting Clone.
On the New item panel, use the Owner dropdown to select your account email. This will ensure the item is cloned into a non-shared context.
Save the cloned item.
Delete the original item by using the options menu for the item and selecting Delete.
Note that in some cases moving the item to a collection with higher access control restrictions, or to a collection that only you have access to, can be more effective than outright removing it from the organization.