Splunk SIEM
Splunk Enterprise is a security information and event management (SIEM) platform that can be used with Bitwarden organizations. Organizations can monitor event activity with the Bitwarden Event Logs app on their Splunk dashboard.
Installing the Bitwarden app on Splunk requires a Splunk Enterprise account. Bitwarden event monitoring is available on:
Splunk Enterprise
Spunk Cloud Classic
Splunk Cloud Victoria
For on-premise Splunk users, the next step is to install Splunk Enterprise. Follow the Splunk documentation to complete an install of the Splunk Enterprise software.
note
Bitwarden is supported on Splunk Enterprise versions 9.3, 9.4, and 10.0. Splunk Enterprise versions 8.X are no longer supported.
Before connecting your Bitwarden organization to your Splunk Dashboard, create an index that will maintain Bitwarden data.
Open the Settings menu located on the top navigation bar and select Indexes.
Once you are on the indexes screen, select New Index. A window will appear for you to create a new index for your Bitwarden app.

New Index In the Index Name field, enter
bitwarden_events.Apply your required values for Max raw data size and Searchable retention.
When you are finished, select Save.


After your Bitwarden index has been created, navigate to your Splunk dashboard.
Open the Apps drop down menu and select Find More Apps.

Splunk apps dashboard Select Browse more apps.
Search Bitwarden Event Logs in the app catalogue. Select Install for the Bitwarden Event Logs app.

Bitwarden event logs app In order to complete the installation, you will need to enter your Splunk account. Your Splunk account may not be the same credentials used to access your Splunk portal.

Login and install Bitwarden app on Splunk After you have entered your information, select Agree and Install.


note
Following the Bitwarden Event Logs app download, you may be required to restart Splunk.
Once the Bitwarden Event Logs app has been installed in your Splunk Enterprise instance, you can connect your Bitwarden organization using your Bitwarden API key.
Go to the dashboard home and select the Bitwarden Event Logs app:

Bitwarden on Splunk dashboard Next, on the App configuration page, select Continue to app setup page. This is where you will add your Bitwarden organization's information.

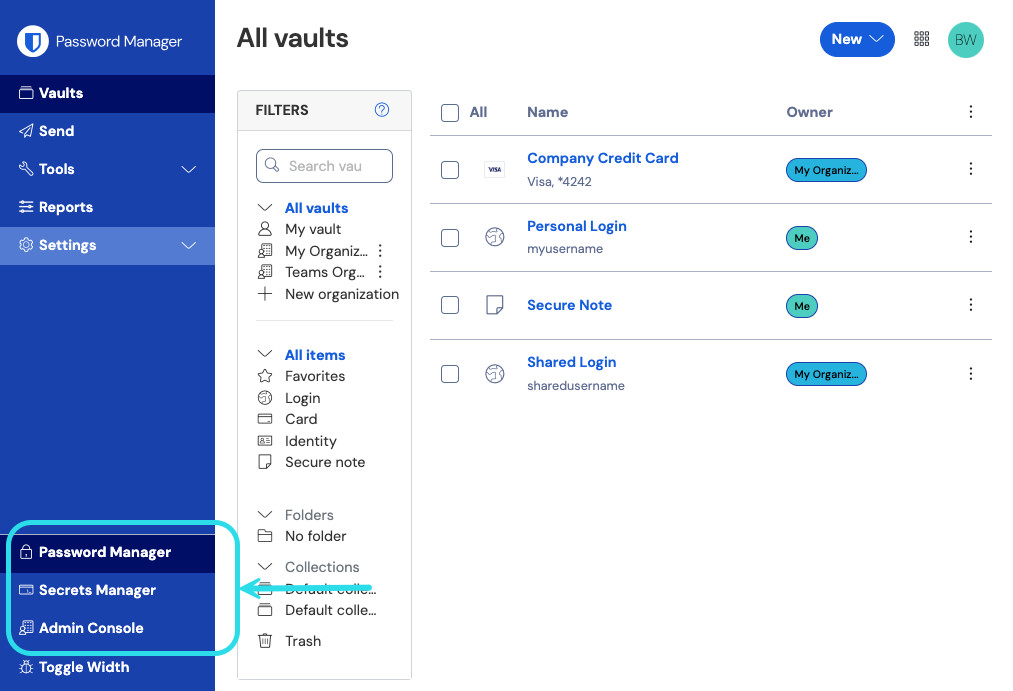
Setup Bitwarden menu Keep this screen open, on another tab, log in to the Bitwarden web app and open the Admin Console using the product switcher:
Product switcher Navigate to your organization's Settings → Organization info screen and select the View API key button. You will be asked to re-enter your master password in order to access your API key information.

Organization api info Copy and paste the
client_idandclient_secretvalues into their respective locations on the Splunk setup page.


Complete the following additional fields as well:
Field | Value |
|---|---|
Index | Select the index that was created previously in the guide: |
Server URL | For self-hosted Bitwarden users, input your self-hosted URL. |
Start date (optional) | Set a start date for data monitoring. When not set, the default date will be set to 1 year. |
note
Your organization API key information is sensitive data. Do not share these values in nonsecure locations.
Once done, select Submit.
The bitwarden_event_logs_index search macro will be created following the initial Bitwarden Event Logs install. To access the macro and adjust settings:
Open the Settings on to top navigation bar. Then, select Advanced Search.
Select Search Macros to open the list of search macros.
Next, setup which user roles will have permission to use the macro:
View macros by selecting Settings → Advanced Search → Search macros.
Select Permissions on
bitwarden_events_logs_index. Edit the following permissions and select Save once complete:
Search Macro Permissions

Field | Description |
|---|---|
Object should appear in | In order to use the macro in event searching, select This app only. The macro will not apply if Keep private is selected. |
Permissions | Select the desired permissions for user roles with Read and Write access. |
note
Only one search macro will be functional on the app at a given time.
The Dashboard will provide several options for monitoring and visualizing Bitwarden organizational data. The three primary categories of data monitoring include:
Bitwarden authentication events
Bitwarden vault item events
Bitwarden organization events
The data displayed on the dashboards will provide information and visualization for a broad variety of searches. More complex queries can be completed by selecting the Search tab at the top of the dashboard.
note
Search results will only populate data relevant to a specific event type that occurred. Attributes that are not in-scope for a specific event type will be displayed as null in the search results. For example, collectionId=null will be present when the event type is a user logging in.
While searching from the Search page or Dashboards, searches can be designated to a specific timeframe.

note
For on-premises users, the following timeframes are supported for Bitwarden event logs searches:
Month to date
Year to date
Previous week
Previous business week
Previous month
Previous year
Last 30 days
All time
Set up specific searches by including search queries. Spunk utilizes its search processing language (SPL) method for searching. See Splunk's documentation for additional details on searches.
Search structure:
Bashsearch | commands1 arguments1 | commands2 arguments2 | ...
An example of a standard search result object:

The fields shown in the standard search object can be included in any specific search. This includes all of the following values:
Bitwarden Fields
Value | Description |
|---|---|
| The email of the user performing the action. |
| Unique id of user performing action. |
| Name of the user performing an action. |
| Organization collection id. |
| Numerical number to identify the device that the action was performed on. |
| Numerical id of device. Exact mapping can be located here. |
| Organization group id. |
| Organization group name. |
| Splunk computed data hash. Learn more about Splunk's data integrity here. |
| The ip address that performed the event. |
| Vault item (cipher, secure note, etc..) of the organization vault. |
| Email of the organization member that the action was directed towards. |
| Unique id of the organization member that the action was directed towards. |
| Name of organization member that action was directed towards. |
| Organization policy update. See organization events here. |
| The event type code that represents the organization event that occurred. See a complete list of event codes with descriptions here. |
| Type numerical id. See mappings here. |
Spunk default fields
The following Splunk default fields will appear in queries. More information on the Splunk's default fields can be located in the Splunk documentation.
Fields:
sourcesourcetypedatedate_hour
date_mday
date_minute
date_month
date_second
date_wday
date_year
date_zone
indexlinecountpunctsplunk_servertimestamp
note
Attributes that are not relevant to the event type will be reported as null.
Search all:
Bashsourcetype="bitwarden:events" type=*Filter results by a specific field
In the following example, the search is looking for actingUserName with a * wildcard which will display all results with actingUserName.
Bashsourcetype="bitwarden:events" actingUserName=*The AND operator is implied in Splunk searches. The following query will search for results containing a specific type AND actingUserName.
Bashsourcetype="bitwarden:events" type=1000 actingUserName="John Doe"Include multiple commands by separating with |. The following will show results with the top value being ipAddress.
Bashsourcetype="bitwarden:events" type=1115 actingUserName="John Doe" | top ipAddressSet user roles
Manage users roles to allow individuals to perform specific tasks. To edit user roles:
1. Open the Settings menu on the top navigation bar.
2. Select Users from the bottom right corner of the menu.
3. From the users screen, locate the user that you wish to edit permissions for and select Edit.

From this screen, details for the user can be filled out. Permission such as admin, power, and can_delete can be individually assigned here as well.
Delete data
Delete Bitwarden search data by clearing the index with SSH access. Data may need to be cleared in instances such as changing the organization being monitored.
Access the Splunk directory and
stopSplunk processes.Clear the
bitwarden_eventsindex with-indexflag. For example:Plain Textsplunk clean eventdata -index bitwaren_eventsRestart Splunk processes.
Splunk Enterprise users, the app will log to:
/opt/splunk/var/log/splunk/bitwarden_event_logs.logIf you are experiencing any errors, or the Bitwarden app is not functioning correctly, users can check the log file for errors or see Spunk's documentation.