Use the Bitwarden generator tool to easily create strong passwords and unique usernames. The password generator is available in all Bitwarden apps and the username generator is available in the web vault, browser extension, desktop app, and mobile app.
The options you specify on this page will be saved until you log out of the web app. You can also quickly generate a strong password using those same options directly from the Add or Edit Item screens using the Generate button:
In-item password generator
note
Select Generator history to access passwords and usernames created in either location with that specific client—even if you don't save them to an item. This history is cleared when you log out.
Select the Generator tab:
Browser extension password generator
You can also generate a strong password from the Edit screen using the Generate button:
Browser extension password generator
If you're creating an account that isn't stored in Bitwarden, you can also use the inline autofill menu to generate and autofill a password using the Fill generated password prompt:
Fill generated password
When using inline, use the generate button to generate a new password until you're satisfied with it. Inline password generation uses the settings from the browser extension's Generator tab. Make sure you select New login when prompted to save the login to Bitwarden. Learn more.
note
Select Generator history to access passwords and usernames created in either location with that specific client—even if you don't save them to an item. This history is cleared when you log out.
Select Generator from the navigation menu:
Desktop app password generator
You can also generate a strong password from the Add/Edit Item screen using the Generate button:
Desktop app password generator
note
Select Generator history to access passwords and usernames created in either location with that specific client—even if you don't save them to an item. This history is cleared when you log out.
Select the Generator tab:
Password generator on mobile
You can also generate a strong password from the Add/Edit Item screen, as well as from the iOS app extension accessible by tapping the Share icon, using the Generate button:
Password generator on mobile
note
Select Generator history to access passwords and usernames created in either location with that specific client—even if you don't save them to an item. This history is cleared when you log out.
Use the generate command to generate a password:
Bash
bw generate -uln --length 14
Additional options flags for generated passwords include:
--minNumber
--minSpecial
--ambiguous
For more information, please refer to the Bitwarden CLI documentation.
Password types
Password
Passwords are randomly generated strings of a customizable set of character types. Options for passwords include:
Length: Number of characters in your password.
Minimum numbers:Minimum number of numbers in your password if 0-9 is enabled.
Minimum special: Minimum number of special characters in your password if !@#$%^&* is enabled.
A-Z:Include uppercase letters in your password.
a-z: Include lowercase letters in your password.
0-9: Include numbers in your password.
!@#$%^&*: Include special characters in your password.
Avoid ambiguous characters: Prevent your passwords from having both a 1 and l or both a 0 and o.
warning
Unless you need to satisfy a site's specific password requirements, we recommend keeping Minimum Numbers and Minimum Special as low as possible (0-1) as over-constraint limits the strength of generated passwords.
Passphrase
Passphrases are randomly generated groups of words, for example panda-lunchroom-uplifting-resisting. Options for passphrases include:
Number of words: Number of words in your passphrase.
Word separator: Character to use to separate words in your passphrase ( - in the above example).
Capitalize: Capitalize the first letter of each word in your passphrase.
Include number: Include a single numerical character in your passphrase.
Generate a username
To generate a username:
You can create a username from the dedicated generator tool or when editing a new or existing item. Depending on which option you prefer:
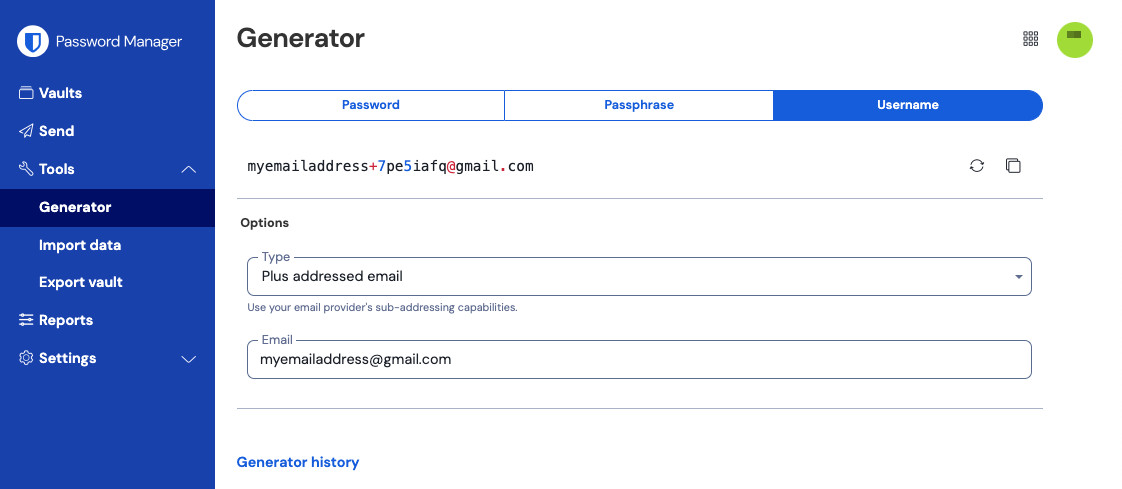
Go to Tools → Generator from the navigation. Then, select Username:
Web app username generator
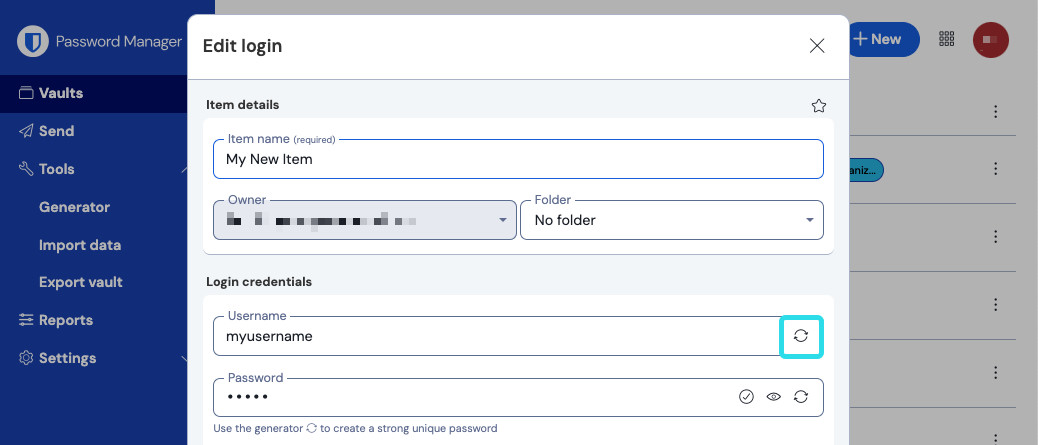
On an item's Edit login screen, select the Generate icon within the Username field:
Web app username generator
With either method, choose your generated username's format from the Type dropdown menu:
Random word (default)
Plus addressed email
Catch-all email
Forwarded email alias
Each username type includes additional options to customize, such as the email's domain name or if numbers are included.
note
Select Generator history to access passwords and usernames created in either location with that specific client—even if you don't save them to an item. This history is cleared when you log out.
You can create a username from the dedicated generator tool or when editing a new or existing item. Depending on which option you prefer:
Select the Generator tab and choose Username:
Browser extension username generator
On an item's Edit login screen, select the Generate icon within the Username field:
Browser extension username generator
With either method, choose your generated username's format from the Type dropdown menu:
Random word (default)
Plus addressed email
Catch-all email
Forwarded email alias
Each username type includes additional options to customize, such as the email's domain name or if numbers are included.
note
Select Generator history to access passwords and usernames created in either location with that specific client—even if you don't save them to an item. This history is cleared when you log out.
You can create a username from the dedicated generator tool or when editing a new or existing item. Depending on which option you prefer:
Select Generator from the navigation menu:
Desktop app username generator
You can also generate a username from the Add/Edit Item screen using the Generate button:
Desktop app username generator
With either method, choose your generated username's format from the Type dropdown menu:
Random word (default)
Plus addressed email
Catch-all email
Forwarded email alias
Each username type includes additional options to customize, such as the email's domain name or if numbers are included.
note
Select Generator history to access passwords and usernames created in either location with that specific client—even if you don't save them to an item. This history is cleared when you log out.
You can create a username from the dedicated generator tool or when editing a new or existing item. Depending on which option you prefer:
Select the Generator tab:
Username generator on mobile
You can also generate a username from the Add/Edit item screen, as well as from the iOS app extension accessible by tapping the Share icon, using the Generate button:
Username generator on mobile
With either method, choose your generated username's format from the Type dropdown menu:
Random word (default)
Plus addressed email
Catch-all email
Forwarded email alias
Each username type includes additional options to customize, such as the email's domain name or if numbers are included.
Username types
Plus Addressed Email
Select this type to use your email provider's sub-addressing (aka "plus addressing" or "aliasing") capabilities. This will generate a plus addressed (named for the + and random string of characters) username based on your specified email address.
On the Add/Edit Item screen of the browser extensions, mobile, and desktop apps, you can select between generating username with a Random (for example, alice+gsd4aqqe@bitwarden.com)string or one based on the item's email address (for example, alice+github.com@bitwarden.com). Email address is limited to browser and desktop as it requires knowledge of the login's URI, in other locations the username generator will default to Random.
tip
Why use plus addressed email?
Plus addressed emails allow you to filter your email for all the junk mail you get when signing up for a new service. Signing up for a service with the username alice+rnok6xsh@bitwarden.com will still send emails to alice@bitwarden.com, but you can easily filter emails that include +rnok6xsh to prevent them from clogging up your inbox.
Catch-all email
Select this type to use your domain's configured catch-all inbox. This will generate a random email address at your specified Domain.
On the Add/Edit Item screen of browser extensions and desktop apps, you can select between generating username with a Random (for example, bqzjlero@gardenllc.com)string or one based on the item's Domain Name (for example, Instagram.com@gardenllc.com). Domain Name is limited to browser and desktop as it requires knowledge of the login's URI, in other locations the username generator will default to Random.
tip
Why use catch-all email?
In some cases, catch-all inboxes are used by companies with their own domain (for example, @bitwarden.com) to prevent emails from going to your personal inbox and instead route them to a shared (and sometimes unchecked) company inbox in case record of them is needed in the future.
In other cases, individuals with their own domain (for example, @gardenllc.com) use catch-all setups to route email from accounts with privacy-oriented usernames (for example Instagram.com@gardenllc.com) to their actual inbox.
Forwarded email alias
Select this type to integrate the username generator with your external aliasing service. While this option is available to all Bitwarden users, some external aliasing service may require a subscription.
Most Bitwarden apps support integration with:
SimpleLogin
Addy.io
Firefox Relay
Fastmail
Forward Email
DuckDuckGo
The Bitwarden mobile app supports integration with:
SimpleLogin
Addy.io
Forward Email
Firefox Relay
tip
Why use forwarded email alias?
Using email aliasing services such as SimpleLogin and Addy.io, you can sign up for web accounts using an anonymous address (for example, nobody-knows-its-me.d0p0r@slmail.me) that will forward mail to your actual inbox (for example, alice@bitwarden.com). This will prevent the website or service from collecting personal information (in this example, the name Alice and the fact that she works at Bitwarden) when you sign up.
To set up your email alias integration:
Log in to your SimpleLogin account.
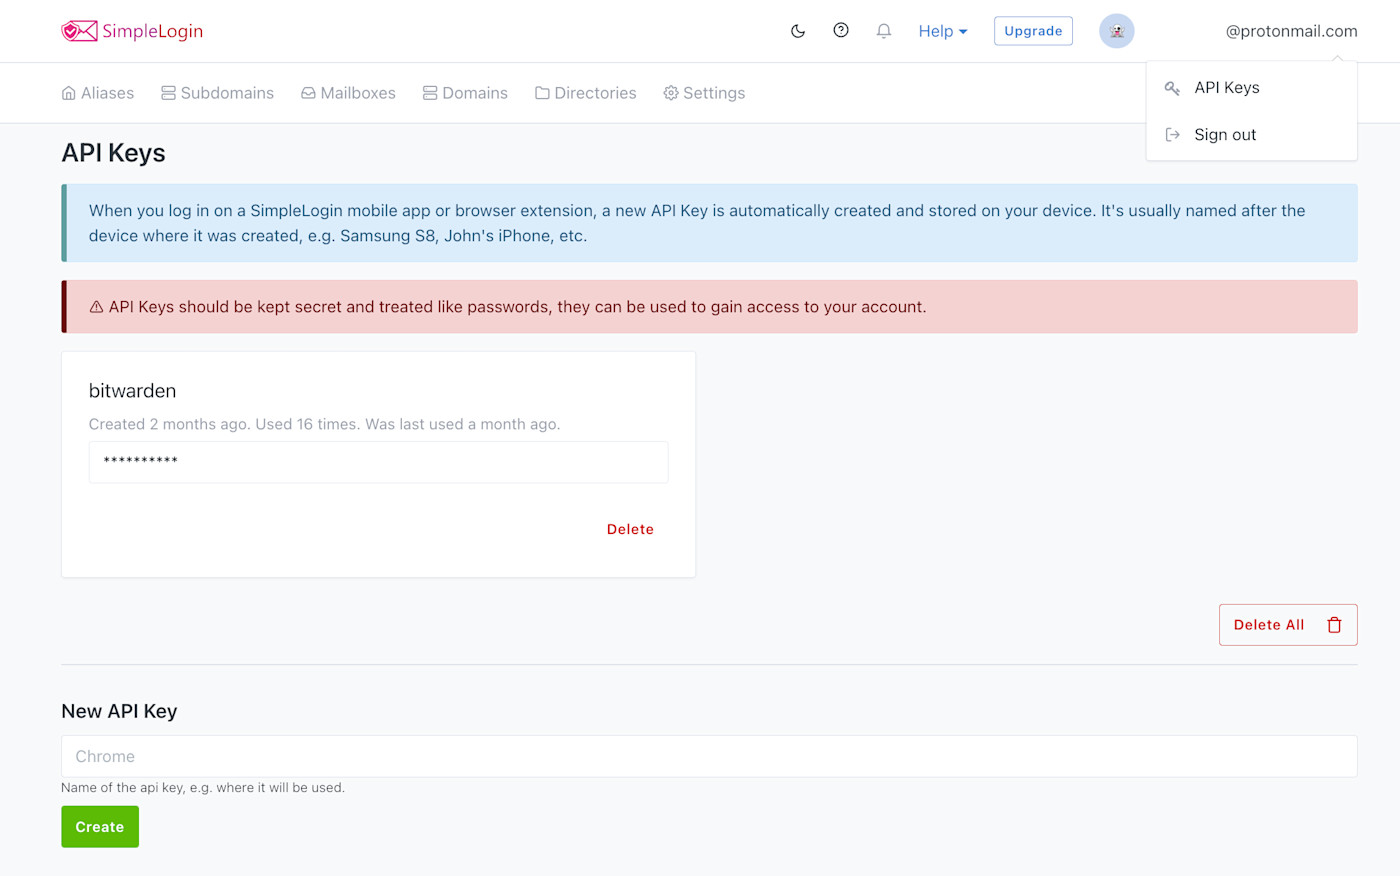
Select the profile icon and choose API Keys from the dropdown. SimpleLogin may require you to enter your password to create an API key.
In the New API Key section, enter a name that indicates the new key will be used by Bitwarden and select Create.
SimpleLogin API Keys
Copy the API Key from SimpleLogin and then open Bitwarden. Go to Generator → Username → Forwarded email alias. Within the options that appear, paste your API Key from SimplyLogin into API Key.
Password Manager browser extensions, mobile apps, and desktop apps can connect to a self-hosted SimpleLogin server. If you're self-hosting SimpleLogin, enter a Server URL.
Select the Generate iconto simultaneously create a username and a corresponding alias in SimpleLogin.
Log in to your Addy.io account.
In Addy.io, select Settings from the navigation menu.
Addy.io settings
Within the General settings, scroll down to Update Default Alias Domain. Select the default domain you wish to use for your alias and select Update Default Alias Domain.
note
The Default Domain selected in Addy.io must match the Email domain entered in the Bitwarden username generator's Forwarded email aliasusername type options.
Scroll to the top of the page and select API Keys from the dropdown menu. Click Create New API Key.
In the Create New API Key dialog, enter a Name that indicates the new token will be used by Bitwarden, an Expiration, and confirm your Addy.io account password. Once you have completed the required fields, select Create API Key:
Addy.io, Create New API Key
Copy the Personal Access Key from Addy.io and then open Bitwarden. Go to Generator → Username → Forwarded email alias. Within the options that appear, paste your Personal Access Key from Addy.io into API Key.
tip
This is the only time Addy.io will display your Personal Access Token (API key), so we recommend saving it to your Bitwarden vault now.
In the Email domainfield, enter the Addy.io domain name you selected in Step 3. As a free user of Addy.io, your options are anonaddy.me, <username>.anonaddy.me or <username>.anonaddy.com.
Password Manager browser extensions, mobile apps, and desktop apps can connect to a self-hosted Addy.io server. If you're self-hosting Addy.io, enter a Server URL.
Select the Generate iconto simultaneously create a username and a corresponding alias in Addy.io.
Log in to your Firefox Relay account.
Select the profile icon and choose Settings from the dropdown:
Firefox Relay Settings Menu
Copy the API Key from Firefox Relay and then open Bitwarden. Go to Generator → Username → Forwarded email alias. Within the options that appear, paste your API Key from Firefox Relay into API Key.
Select the Generate iconto simultaneously create a username and a corresponding mask in Firefox Relay.
Log in to your Fastmail account.
Select the profile icon and choose Settings from the dropdown.
From the navigation menu, select Privacy & Security and then Manage API tokens:
Fastmail API token
Select New API token to generate an API token.
New API token
Include the following settings:
Read-only accessdisabled.
Masked Email enabled.
Copy the API Key from Fastmail and then open Bitwarden. Go to Generator → Username → Forwarded email alias. Within the options that appear, paste your API Key from Fastmail into API Key.
Select the Generate iconto simultaneously create a username and a corresponding alias in Fastmail.
Forward Email uses the default domain hideaddress.net, however if you have a registered domain you can connect it to the service. For more information, refer to the Forward Email setup guides.
In Forward Email, navigate to the My Account → Security page and copy the Developer Access API token:
Copy Forward Email API token
Open Bitwarden and go to Generator → Username → Forwarded email alias. From the options that appear:
Paste your API Key from Forward Email into API Key.
Within Email domain, enter hideaddress.net or your registered domain name.
Select the Generate iconto simultaneously create a username and a corresponding alias in Forward Email.
Once your Duck Address has been setup, select the Autofill tab on the DuckDuckGo email protection page, and open your web browser's developer tools.
Click the Generate Private Duck Address button and view the Network tab on your developer tools window. Select the "Addresses" call for the API POST request, and locate the API authorization item. The item will look like this: authorization: Bearer <API token value>.
Generate DuckDuckGo email alias
Copy the API authorization token value from DuckDuckGo and then open Bitwarden. Go to Generator → Username → Forwarded email alias. Within the options that appear, paste your API authorization token value from DuckDuckGo into API Key.
Select the Generate iconto simultaneously create a username and a corresponding alias in DuckDuckGo.
Random word
Select this type to generate a random word for your username. Options for random words include:
Capitalize: Capitalize your username.
Include Number: Include a 4-digit number in your username.
Suggest changes to this page
How can we improve this page for you? For technical, billing, and product questions, please contact support