Microsoft Entra ID SAML
This article contains Azure-specific help for configuring Login with SSO via SAML 2.0. For help configuring login with SSO for another IdP, refer to SAML 2.0 Configuration.
Configuration involves working simultaneously with the Bitwarden web app and the Azure Portal. As you proceed, we recommend having both readily available and completing steps in the order they are documented.
tip
Already an expert? Skip the instructions in this article and download the quick configuration guide to setup SSO and SCIM with Entra ID.
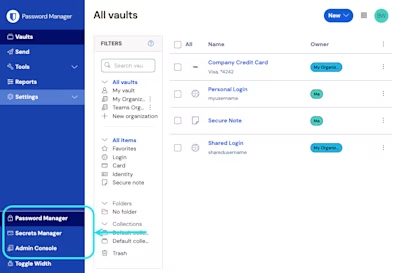
Log in to the Bitwarden web app and open the Admin Console using the product switcher:
Open your organization's Settings → Single sign-on screen:
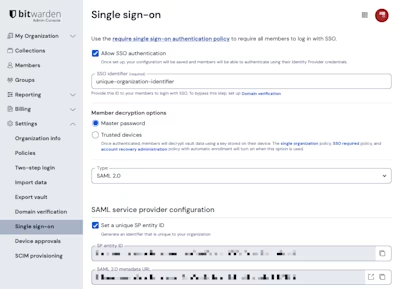
If you haven't already, create a unique SSO identifier for your organization and select SAML from the the Type dropdown. Keep this screen open for easy reference.
You can turn off the Set a unique SP entity ID option at this stage if you wish. Doing so will remove your organization ID from your SP entity ID value, however in almost all cases it is recommended to leave this option on.
tip
There are alternative Member decryption options. Learn how to get started using SSO with trusted devices or Key Connector.
In the Azure Portal, navigate to Microsoft Entra ID and select Enterprise applications from the navigation menu:

Select the New application button:

On the Browse Microsoft Entra ID Gallery screen, select the Create your own application button:

On the Create your own application screen, give the application a unique, Bitwarden-specific name and select the (Non-gallery) option. Once you are finished, click the Create button.
From the Application Overview screen, select Single sign-on from the navigation:

On the Single Sign-On screen, select SAML.
Select the Edit button and configure the following fields:
Field | Description |
|---|---|
Identifier (Entity ID) | Set this field to the pre-generated SP Entity ID. This automatically-generated value can be copied from the organization's Settings → Single sign-on screen and will vary based on your setup. |
Reply URL (Assertion Consumer Service URL) | Set this field to the pre-generated Assertion Consumer Service (ACS) URL. This automatically-generated value can be copied from the organization's Settings → Single sign-on screen and will vary based on your setup. |
Sign on URL | Set this field to the login URL from which users will access Bitwarden. |
The default claims constructed by Azure may work with certain configurations, however, it is recommended to change the Unique User Identifier (Name ID) to user.objectid to avoid conflicts if non-static data such as an email or UPN change.
Select the Edit button and select the Unique User Identifier (Name ID) entry to edit the NameID claim:

Options include Default, Email Address, Persistent, Unspecified, and Windows qualified domain name. For more information, refer to Microsoft Azure documentation.
Download the Base64 Certificate for use during a later step from the SAML Certificates section of this page.
Copy or take note of the Login URL and Microsoft Entra ID Identifier in this section for use during a later step:

note
If you receive any key errors when logging in via SSO, try copying the X509 certificate information from the Federation Metadata XML file instead.
Select Users and groups from the navigation:

Select the Add user/group button to assign access to the login with SSO application on a user or group-level.
At this point, you have configured everything you need within the context of the Azure Portal. Return to the Bitwarden web app to complete configuration.
The Single sign-on screen separates configuration into two sections:
SAML service provider configuration will determine the format of SAML requests.
SAML identity provider configuration will determine the format to expect for SAML responses.
Configure the following fields:
Field | Description |
|---|---|
Name ID Format | By default, Azure will use email address. If you changed this setting, select the corresponding value. Otherwise, set this field to Unspecified or Email Address. |
Outbound Signing Algorithm | The algorithm Bitwarden will use to sign SAML requests. |
Signing Behavior | Whether/when SAML requests will be signed. |
Minimum Incoming Signing Algorithm | By default, Azure will sign with RSA SHA-256. Select |
Want Assertions Signed | Whether Bitwarden expects SAML assertions to be signed. |
Validate Certificates | Check this box when using trusted and valid certificates from your IdP through a trusted CA. Self-signed certificates may fail unless proper trust chains are configured with the Bitwarden login with SSO docker image. |
When you are done with the service provider configuration, Save your work.
Identity provider configuration will often require you to refer back to the Azure Portal to retrieve application values:
Field | Description |
|---|---|
Entity ID | Enter your Microsoft Entra ID Identifier, retrieved from the Azure Portal's Set up your application section. This field is case sensitive. |
Binding Type | Set to HTTP POST or Redirect. |
Single Sign On Service URL | Enter your Login URL, retrieved from the Azure Portal's Set up your application section. |
Single Log Out Service URL | Login with SSO currently does not support SLO. This option is planned for future development, however you may preconfigure it with your Logout URL if you wish. |
X509 Public Certificate | Paste the downloaded certificate, removing
and
|
Outbound Signing Algorithm | By default, Azure will sign with RSA SHA-256. Select |
Disable Outbound Logout Requests | Login with SSO currently does not support SLO. This option is planned for future development. |
Want Authentication Requests Signed | Whether Azure expects SAML requests to be signed. |
note
When completing the X509 certificate, take note of the expiration date. Certificates will need to be renewed to prevent any disruptions in service to SSO end-users. If a certificate expires, Admin and Owner accounts can still log in with their email address and master password.
When you are done with the identity provider configuration, Save your work.
tip
You can require users to log in with SSO by activating the single sign-on authentication policy.
Once your configuration is complete, test it by navigating to https://vault.bitwarden.com, entering your email address and selecting the Use single sign-on button:
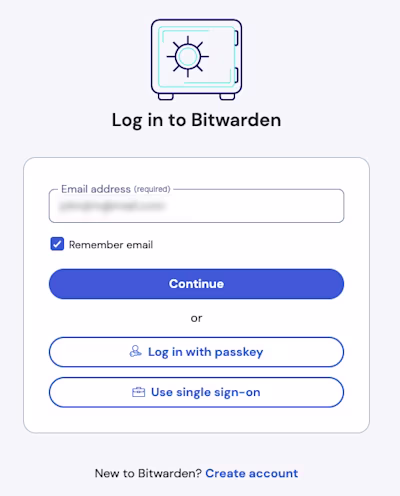
Enter the configured organization identifier and select Log In. If your implementation is successfully configured, you will be redirected to the Microsoft login screen:

After you authenticate with your Azure credentials, enter your Bitwarden master password to decrypt your vault!
note
Bitwarden does not support unsolicited responses, so initiating login from your IdP will result in an error. The SSO login flow must be initiated from Bitwarden. Entra ID SAML administrators can setup an Enterprise application for users to be directed to the Bitwarden SSO login page:
Disable the existing Bitwarden button in the All Applications page by navigating to the current Bitwarden enterprise Application, selecting Properties, and setting the Visible to users option to No.
Create a new app registration by navigating to Enterprise applications and selecting New application.
Select Create your own application.
Provide a name for the application such as Bitwarden, then select Integrate any other application you don't find in the gallery (Non-gallery). Once you have finished, select Create.
Once the app has been created, navigate to Single sign-on located on the navigation menu. Select Linked.
Add the following settings to the application:
Set the Sign on URL to your Bitwarden client login page, such as
https://vault.bitwarden.com/#/sso. Then, select Save.You may change the logo for end-user recognition in Properties. You can retrieve the Bitwarden logo here.
Once this process has been completed, assigned users will have a Bitwarden application that will link them directly to the Bitwarden web vault SSO login page.