Licentie Organisaties of Premium
Het zelf hosten van Bitwarden is gratis, maar sommige functies moeten worden ontgrendeld in uw zelf gehoste instantie met een geregistreerd licentiebestand. Een licentiebestand kan worden verkregen via de Bitwarden-hosted webapp door een account met een premium individueel abonnement of door de eigenaar van een organisatie.
De stappen zijn verschillend wanneer je werkt met een individuele licentie versus een organisatielicentie.
note
The procedures in this article assume that you have already started a paid subscription to Bitwarden. If you haven't, refer to About Bitwarden Plans and What Plan is Right for Me?
Individuele licentie
Volg deze procedures als u werkt met een individuele licentie voor een premium abonnement. Je werkt zowel in de cloud web vault als in je self-hosted web vault, en de e-mailadressen van je account moeten overeenkomen.
Individuele licentie ophalen
Nadat je een account hebt aangemaakt op je zelf gehoste server, haal je je licentie op uit de cloud web app:
Log in en selecteer Instellingen → Abonnement in de navigatie.
Selecteer de knop Licentie downloaden:

Download personal license

Individuele licentie toepassen
Log vervolgens in op uw zelf gehoste Bitwarden-server om de gedownloade licentie toe te passen:
Verifieer uw e-mailadres als u dat nog niet hebt gedaan. Hiervoor moet u SMTP-gerelateerde omgevingsvariabelen hebben geconfigureerd.
Selecteer Instellingen → Abonnement in de navigatie.
Selecteer in de sectie Licentiebestand de knop Bladeren... of Bestand kiezen en voeg het gedownloade licentiebestand toe.
Selecteer de knop Submit (Verzenden) om uw premium licentie toe te passen.
Individuele licentie bijwerken
Als u om welke reden dan ook uw individuele licentiebestand moet bijwerken, bijvoorbeeld wanneer het verloopt:
Volg de stappen om je licentie opnieuw op te halen.
Volg de stappen om je licentie opnieuw toe te passen, alleen zie je deze keer een knop Licentie bijwerken in plaats van een knop om naar een nieuwe licentie te bladeren.
Organisatielicentie
Volg deze procedures als je werkt met een organisatielicentie voor een gezins- of bedrijfsorganisatie. Je moet organisatie-eigenaar zijn om een licentie op te halen, toe te passen en bij te werken.
Organisatielicentie ophalen
Voordat je een organisatie start op je zelf gehoste server, haal je de organisatielicentie op uit de cloud web app.
Open in de Bitwarden web-app de beheerconsole met behulp van de productswitcher:
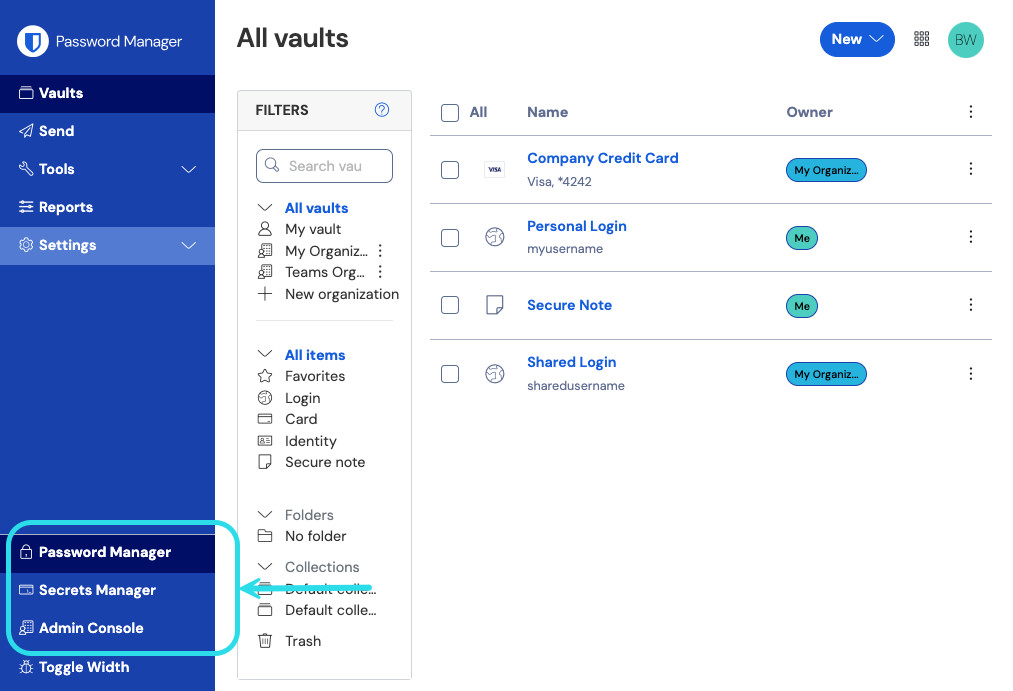
Product switcher Navigeer naar Facturering → Abonnement.
Scroll naar beneden en selecteer de knop Licentie downloaden.
Als daarom wordt gevraagd, voert u de installatie-ID in die is gebruikt om uw zelf gehoste server te installeren en selecteert u Submit (Verzenden). Als je de installatie-ID niet direct weet, kun je deze ophalen in
./bwdata/env/global.override.env.
note
Make sure that the installation ID you retrieved from bitwarden.com/host uses the same data region as where your organization exists.
Organisatielicentie toepassen
Het toepassen van je licentie in een zelf gehoste server is de manier waarop je een zelf gehoste organisatie aanmaakt. Vanuit je zelf gehoste webkluis:
Start een nieuwe organisatie door de knop Organisatie toevoegen te selecteren.
Selecteer de knop Bladeren... of Bestand kiezen, voeg het gedownloade licentiebestand toe en selecteer Submit.
note
Als je een foutmelding krijgt over een versie die niet wordt ondersteund, werk dan je server bij en probeer je licentiebestand opnieuw te uploaden. Om je server bij te werken, maak je een back-up van de map bwdata en volg je deze instructies.
Organisatielicentie bijwerken
Organisaties moeten het licentiebestand dat door hun zelf gehoste server wordt gebruikt bijwerken in verschillende scenario's, bijvoorbeeld:
Om gebruikersplaatsen toe te voegen aan een zelf gehoste organisatie. Het aantal plaatsen voor zelfgehoste organisaties wordt bepaald door de licentie, dus om plaatsen toe te voegen moeten ze eerst worden toegevoegd aan de bijbehorende cloud-organisatie en vervolgens moet de licentie die door je zelfgehoste organisatie wordt gebruikt, worden bijgewerkt.
Om de werking van de zelf gehoste organisatie voort te zetten wanneer de licentie wordt vernieuwd. Je hebt 60 dagen, vanaf de datum van verlenging, om het licentiebestand naar je zelf gehoste server bij te werken voordat je zelf gehoste organisatie wordt uitgeschakeld.
Er zijn twee methoden om de licentie van een zelf gehoste organisatie bij te werken, maar Families kunnen alleen handmatig updaten:
Automatic sync:
Eliminates the need for organization admins to manually re-upload licenses. Once setup, admins will only need to trigger a sync from the Organization → Billing when an update to the license used by the self-hosted organization is required.
Makes Families sponsorships possible for members of self-hosted organizations. Sync for these sponsorships will automatically occur per day.
Cannot be setup by organizations still in a free trial period.
To set up automatic sync:
Step 1: Enable cloud communication
note
Deze stap moet worden uitgevoerd door iemand die toegang heeft tot de configuratiebestanden van je zelf gehoste instantie.
Configure your server to allow communication with Bitwarden cloud systems by setting the following lines in bwdata/env/global.override.env:
BashglobalSettings__enableCloudCommunication=true globalSettings__baseServiceUri__cloudRegion=US
If your cloud organization was created on EU servers, you'll need make the following changes to configure for communication with EU cloud servers:
Change the second of these lines to
globalSettings__baseServiceUri__cloudRegion=EU.Set the following 3 additional values:
BashglobalSettings__installation__identityUri=https://identity.bitwarden.eu globalSettings__installation__apiUri=https://api.bitwarden.eu globalSettings__pushRelayBaseUri=https://push.bitwarden.eu
note
De waarde voor globalSettings__baseServiceUri__cloudRegion moet overeenkomen met de gegevensregio die is geselecteerd bij het ophalen van uw installatie-id en -sleutel.
Once you have set these value, apply your change by running the ./bitwarden.sh rebuild command. Start your server again with the ./bitwarden.sh start command.
note
Het inschakelen van automatische synchronisatie vereist communicatie met de cloudsystemen van Bitwarden. Als je omgeving een firewall gebruikt om uitgaand verkeer te blokkeren, moet je https://api.bitwarden.com of .eu en https://identity.bitwarden.com of .eu toestaan.
Step 2: Retrieve billing sync token
Once cloud communication is enabled at the server-level, a sync token needs to be passed from the cloud organization that is associated with your self-hosted organization. To retrieve your sync token from the cloud web app:
Open the cloud Admin Console and navigate to Billing → Subscription.
In the self-hosting section, select Set up billing sync.
Enter your master password and select Generate token.
Copy the generated token.
Step 3: Apply billing sync token
To apply the billing sync token to your self-hosted organization:
Open the self-hosted Admin Console and navigate to Billing → Subscription.
In the License and billing management section, choose the Automatic sync option.
Select the Manage billing sync button.
Paste your generated Billing Sync Token and select Save.
note
De synchronisatie voor Families voor Ondernemingen vindt eenmaal per dag plaats zodra je de eerste synchronisatie hebt geactiveerd. Het veld Laatste synchronisatie in dit gedeelte meldt Nooit totdat je de eerste synchronisatie start.
Synchronisatie voor licentie-updates moet altijd handmatig worden uitgevoerd door de knop Licentie synchroniseren te selecteren (zie de volgende sectie voor meer informatie).
Step 4: Trigger sync
Trigger a sync once you've completed setup and each time you need to update your license. Sync for Familes for Enterprise will occur once daily. To trigger a sync:
Open the self-hosted Admin Console and navigate to Organization → Billing.
Select the Sync license button.
note
Als je een foutmelding krijgt over een versie die niet wordt ondersteund, werk dan je server bij en probeer je licentiebestand opnieuw te uploaden. Om je server bij te werken, maak je een back-up van de map bwdata en volg je deze instructies.