ADFS SAML
This article contains Active Directory Federation Services (AD FS)-specific help for configuring login with SSO via SAML 2.0. For help configuring login with SSO for another IdP, refer to SAML 2.0 Configuration.
Configuration involves working simultaneously within the Bitwarden web app and the AD FS Server Manager. As you proceed, we recommend having both readily available and completing steps in the order they are documented.
tip
Already an SSO expert? Skip the instructions in this article and download screenshots of sample configurations to compare against your own.
Open SSO in the web app
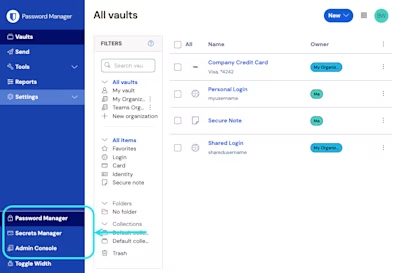
Log in to the Bitwarden web app and open the Admin Console using the product switcher:
Open your organization's Settings → Single sign-on screen:
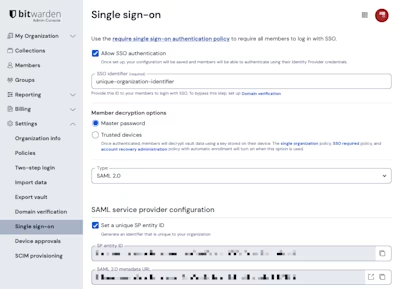
If you haven't already, create a unique SSO identifier for your organization and select SAML from the the Type dropdown. Keep this screen open for easy reference.
You can turn off the Set a unique SP entity ID option at this stage if you wish. Doing so will remove your organization ID from your SP entity ID value, however in almost all cases it is recommended to leave this option on.
tip
There are alternative Member decryption options. Learn how to get started using SSO with trusted devices or Key Connector.
Create a relying party trust
In the AD FS Server Manager, select Tools → AD FS Management → Action → Add Relying Party Trust. In the wizard, make the following selections:
On the Welcome screen, select Claims Aware.
On the Select Data Source screen, select Enter data about the relying party manually.
On the Specify Display Name screen, enter a Bitwarden-specific display name.
On the Configure Certificate screen, upload a token encryption certificate if you have one available. This step is optional.
On the Configure URL screen, select Enable support for SAML 2.0 WebSSO protocol.
In the Relying party SAML 2.0 SSO service URL input, enter the Assertion Consumer Service (ACS) URL. This automatically-generated value can be copied from the organization's Settings → Single sign-on screen and will vary based on your setup.
On the Configure Identifiers screen, add the SP Entity ID as a relying party trust identifier. This automatically-generated value can be copied from the organization's Settings → Single sign-on screen and will vary based on your setup.
On the Choose Access Control Policy screen, select the policy that meets your security standards (by default, Permit Everyone).
On the Ready to Add Trust screen, review your selections.
Advanced options
Once the relying party trust is created, you can further configure its settings by selecting Relying Party Trusts from the left-hand file navigator and selecting the correct display name.
Hash algorithm
To change the Secure hash algorithm (by default, SHA-256), navigate to the Advanced tab:

Endpoint binding
To change the endpoint Binding (by default, POST), navigate to the Endpoints tab and select the configured ACS URL:

Edit claim issuance rules
Construct claim issuance rules to ensure that the appropriate claims, including Name ID, are passed to Bitwarden. To edit claim issuance rules, navigate to Edit Claim Issuance Policy by returning to the previous screen, and selecting it from the right-hand navigation.
The following tabs illustrate a sample ruleset:
Rule 1 uses the Claim rule Template Send LDAP Attributes as Claims.


Get certificate
In the left-hand file navigator, select AD FS → Service → Certificates to open the list of certificates. Select the Token-signing certificate, navigate to its Details tab, and select the Copy to File... button to export the Base-64 encoded token signing certificate:

You will need this certificate during a later step.
Get federation service identifier
In the left-hand file navigator, select AD FS and from the right-hand options menu select Edit Federation Service Properties. In the Federation Service Properties window, copy the Federation Service Identifier:

You will need this identifier during a later step.
Back to the web app
At this point, you have configured everything you need within the context of the AD FS Server Manager. Return to the Bitwarden web app to complete configuration.
The Single sign-on screen separates configuration into two sections:
SAML service provider configuration will determine the format of SAML requests.
SAML identity provider configuration will determine the format to expect for SAML responses.
Service provider configuration
In the service provider configuration section, configure the following fields:
Field | Description |
|---|---|
Name ID Format | Select the Outgoing Name ID Format selected when constructing claims issuance rules (see Rule 3). |
Outbound Signing Algorithm | The algorithm Bitwarden will use to sign SAML requests. |
Signing Behavior | Whether/when SAML requests will be signed. |
Minimum Incoming Signing Algorithm | By default, AD FS will sign with SHA-256. Select SHA-256 from the dropdown unless you have configured AD FS to use different algorithm. |
Expect Signed Assertions | Whether Bitwarden expects SAML assertions to be signed. |
Validate Certificates | Check this box when using trusted and valid certificates from your IdP through a trusted CA. Self-signed certificates may fail unless proper trust chains are configured within the Bitwarden login with SSO docker image. |
When you are done with the service provider configuration, Save your work.
Identity provider configuration
Identity provider configuration will often require you to refer back to the AD FS Server Manager to retrieve values:
Field | Description |
|---|---|
Entity ID | Enter the retrieved Federation Service Identifier. Please note, this may not use HTTPS. This field is case sensitive. |
Binding type | By default, AD FS with use HTTP POST endpoint binding. Select HTTP POST unless you have configured AD FS to use a different method. |
Single sign on service URL | Enter the SSO Service Endpoint. This value can be constructed in the Service → Endpoints tab in AD FS Manager. The endpoint URL is listed as URL Path for SAML2.0/WS-Federation and is usually something like |
X509 public certificate | Paste the downloaded certificate, removing
and
|
Outbound signing algorithm | By default, AD FS will sign with SHA-256. Select SHA-256 from the dropdown unless you have configured AD FS to use different algorithm. |
Allow outbound logout requests | Login with SSO currently does not support SLO. This option is planned for future development. |
Sign authentication requests | Whether AD FS expects SAML requests to be signed. |
note
When completing the X509 certificate, take note of the expiration date. Certificates will have to be renewed in order to prevent any disruptions in service to SSO end users. If a certificate has expired, Admin and Owner accounts will always be able to log in with email address and master password.
When you are done with the identity provider configuration, Save your work.
tip
You can require users to log in with SSO by activating the single sign-on authentication policy. Please note, this will require activating the single organization policy as well. Learn more.
Test the configuration
Once your configuration is complete, test it by navigating to https://vault.bitwarden.com, entering your email address and selecting the Use single sign-on button:
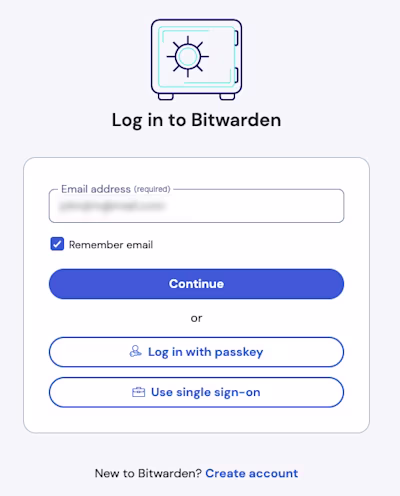
Enter the configured organization identifier and select Log In. If your implementation is successfully configured, you will be redirected to the AD FS SSO login screen. After you authenticate with your AD FS credentials, enter your Bitwarden master password to decrypt your vault!
note
Bitwarden does not support unsolicited responses, so initiating login from your IdP will result in an error. The SSO login flow must be initiated from Bitwarden.