Microsoft Entra ID OIDC
This article contains Azure-specific help for configuring Login with SSO via OpenID Connect (OIDC). For help configuring Login with SSO for another OIDC IdP, or for configuring Microsoft Entra ID via SAML 2.0, see OIDC Configuration or Microsoft Entra ID SAML Implementation.
Configuration involves working simultaneously within the Bitwarden web app and the Azure Portal. As you proceed, we recommend having both readily available and completing steps in the order they are documented.
Log in to the Bitwarden web app and open the Admin Console using the product switcher:
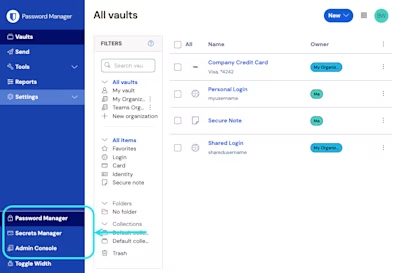
Select Settings → Single sign-on from the navigation:

If you haven't already, create a unique SSO identifier for your organization. Otherwise, you don't need to edit anything on this screen yet, but keep it open for easy reference.
tip
There are alternative Member decryption options. Learn how to get started using SSO with trusted devices or Key Connector.
In the Azure Portal, navigate to Microsoft Entra ID and select App registrations. To create a new app registration, select the New registration button:

Complete the following fields:

On the Register an application screen, give your app a Bitwarden-specific name and specify which accounts should be able to use the application. This selection will determine which users can use Bitwarden login with SSO.
Select Authentication from the navigation and select the Add a platform button.
Select the Web option on the Configure platforms screen and enter your Callback Path in the Redirect URIs input.
note
Callback Path can be retrieved from the Bitwarden SSO Configuration screen. For cloud-hosted customers, this is https://sso.bitwarden.com/oidc-signin or https://sso.bitwarden.eu/oidc-signin. For self-hosted instances, this is determined by your configured server URL, for example https://your.domain.com/sso/oidc-signin.
Select Certificates & secrets from the navigation, and select the New client secret button:

Give the certificate a Bitwarden-specific name, and choose an expiration timeframe.
Select API permissions and click Grant admin consent for {your directory}. The only permission needed is added by default, Microsoft Graph > User.Read.
At this point, you have configured everything you need within the context of the Azure Portal. Return to the Bitwarden web app to configure the following fields:
Field | Description |
|---|---|
Authority | Enter |
Client ID | Enter the App registration's Application (client) ID, which can be retrieved from the Overview screen. |
Client Secret | Enter the Secret Value of the created client secret. |
Metadata Address | For Azure implementations as documented, you can leave this field blank. |
OIDC Redirect Behavior | Select either Form POST or Redirect GET. |
Get Claims From User Info Endpoint | Enable this option if you receive URL too long errors (HTTP 414), truncated URLS, and/or failures during SSO. |
Additional/Custom Scopes | Define custom scopes to be added to the request (comma-delimited). |
Additional/Custom User ID Claim Types | Define custom claim type keys for user identification (comma-delimited). When defined, custom claim types are searched for before falling back on standard types. |
Additional/Custom Email Claim Types | Define custom claim type keys for users' email addresses (comma-delimited). When defined, custom claim types are searched for before falling back on standard types. |
Additional/Custom Name Claim Types | Define custom claim type keys for users' full names or display names (comma-delimited). When defined, custom claim types are searched for before falling back on standard types. |
Requested Authentication Context Class Reference values | Define Authentication Context Class Reference identifiers ( |
Expected "acr" Claim Value in Response | Define the |
When you are done configuring these fields, Save your work.
tip
You can require users to log in with SSO by activating the single sign-on authentication policy.
If your SSO configuration requires custom claim types, additional steps are required in order for Microsoft Entra ID to recognize the non-standard claims.
On Microsoft Entra ID, add a custom claim type by navigating to Enterprise applications → App registrations → Token configuration.
Select Add optional claim and create a new optional claim with a selected value.
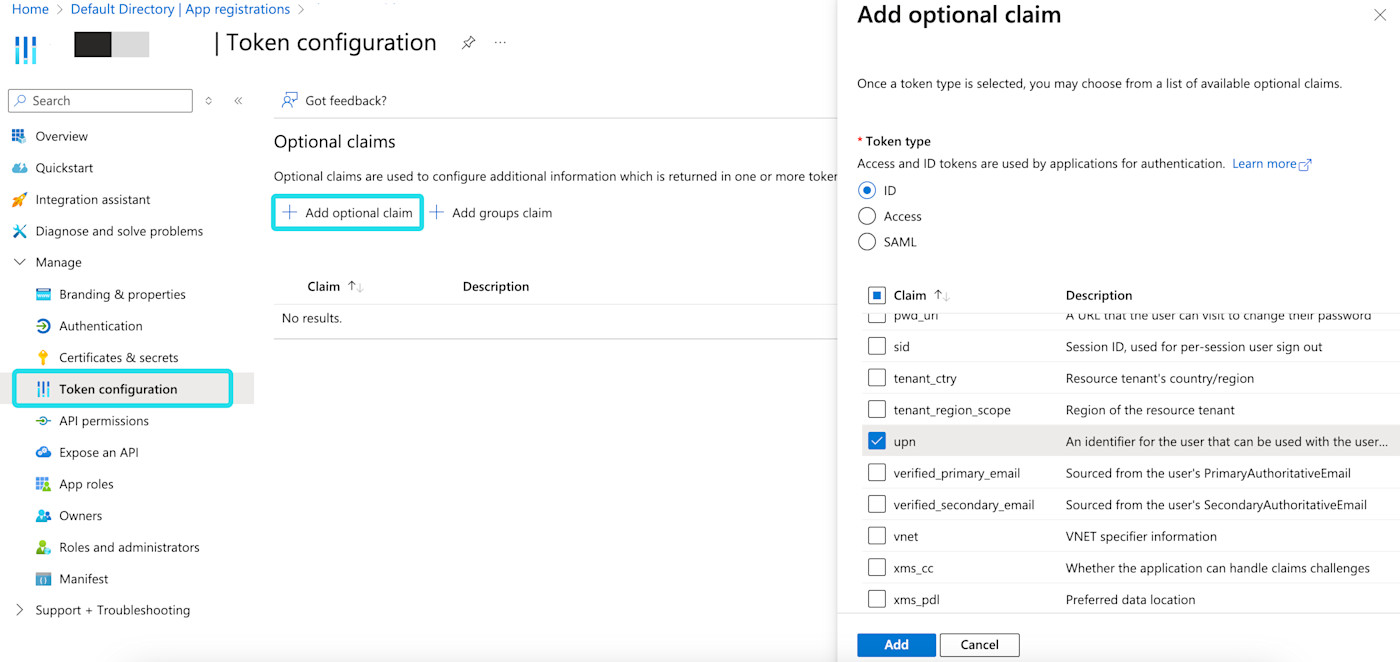
Microsoft Entra ID custom claim On the Bitwarden SSO configuration screen, enter the fully qualified path for a custom claim field in the corresponding custom claim types field. For example:
https://schemas.xmlsoap.org/ws/2005/05/identity/claims/upn.Select Save once you have completed the configuration.

Once your configuration is complete, test it by navigating to https://vault.bitwarden.com, entering your email address and selecting the Use single sign-on button:
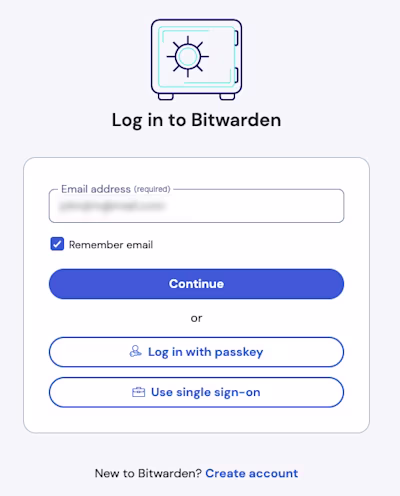
Enter the configured organization identifier and select Log In. If your implementation is successfully configured, you will be redirected to the Microsoft login screen:

After you authenticate with your Azure credentials, enter your Bitwarden master password to decrypt your vault!
note
Bitwarden does not support unsolicited responses, so initiating login from your IdP will result in an error. The SSO login flow must be initiated from Bitwarden.
Educate your organization members on how to use login with SSO.