Quickly transfer your saved passwords in Chromium-based browsers, like Google Chrome, Microsoft Edge, and Opera, to your Bitwarden vault. There are two methods:
Export your data from a desktop or mobile browser.
To export passwords from Chrome or Edge on your desktop:
Open your browser's settings and navigate to the password settings, for example chrome://password-manager/settings or edge://wallet/passwords.
Locate Export Passwords and click Download file. You may be prompted to enter your computer's password for authorization. For Microsoft Edge, this may be hidden behind a menu in the Saved passwords section.
Specify a location to save your export to, and verify that the format is comma-separated values (CSV).
Select Save to finish exporting.
To export passwords from Chrome or Edge on your mobile device:
Tap the menu button and tap Password Manager.
Tap Settings.
Tap Export Passwords... .
You may be prompted to enter your device PIN or a biometric for authorization.
Specify a location to save your export to.
Import to Bitwarden
Data can be imported to Bitwarden from the web app, browser extension, desktop app, and CLI. Data is encrypted locally before being sent to the server for storage.
note
While some item types cannot be imported, you can still add them to a vault:
From the Vault dropdown menu, select where to save the data:
To save data in your personal vault, select My vault. (Optional) Choose an existing Folder to organize the imported items.
note
If your data file contains folders from your previous password manager and you select a destination folder from the dropdown menu, the imported folders will be nested inside the folder you selected.
To save data in an organization's vault, select the organization's name. (Optional) Choose a Collection to organize the imported items and share with other members. (You can only choose a collection where you have can manage permission.)
From the File format dropdown menu, select the file format of your exported data.
To enter your data, do one of the following:
Select Choose File and pick the exported file from your computer.
Copy and paste the contents of your exported file into the text box.
warning
Importing does not check for duplicates. If you import the same file more than once or import items already in your vault, duplicate items will be created.
Select Import. If you're importing a password-protected .json file, enter the password into the Confirm vault import window that appears.
After your data is imported, delete the exported data file from your computer. This will protect you in the event your computer is compromised. If you're importing to Bitwarden from another password manager or browser, you may also want to delete data from that tool.
To import data to your vault:
Select Settings.
Select Vault options.
Select Import items. A new window will appear.
From the Vault dropdown menu, select where to save the data:
To save data in your personal vault, select My vault. (Optional) Choose an existing Folder to organize the imported items.
note
If your data file contains folders from your previous password manager and you select a destination folder from the dropdown menu, the imported folders will be nested inside the folder you selected.
To save data in an organization's vault, select the organization's name. (Optional) Choose a Collection to organize the imported items and share with other members. (You can only choose a collection where you have can manage permission.)
Select Choose File and pick the file or copy and paste your file’s contents into the text box.
warning
Importing does not check for duplicates. If you import the same file more than once or import items already in your vault, duplicate items will be created.
Select Import data. If you are importing a password protected .json file, enter the password into the Confirm vault import window that appears.
After your data is imported, delete the exported data file from your device. This will protect you in the event your computer is compromised. If you're importing to Bitwarden from another password manager or browser, you may also want to delete data from that tool.
There are two ways to import data when using a mobile device. Direct import with CXP is often the easiest, but is only supported by a limited number of password manager apps at this time.
Most common method for mobile
For most devices, open a mobile browser. Log in to Bitwarden there and follow the web app import steps.
Direct import with the Credential Exchange Protocol (CXP)
Bitwarden supports the FIDO Credential Exchange Protocol (CXP). This facilitates an alternate, often faster import path by removing the need to manually download and handle a data file. The password manager app that currently stores your data must also support CXP, and the steps vary by application.
CXP with iOS devices
To import data using a mobile device with iOS 26+:
Open the other CXP-compatible password manager app where your data is saved.
Depending on the app, find the export data option and choose which items to import. You may need to complete extra steps, like logging in or confirming you want to move data.
note
In the Apple Passwords app, for example:
Tap the Options icon.
Tap Export Data to Another App.
Check which passwords and passkeys you want to transfer from the list that appears. When done, tap Continue.
On the Export Passwords screen, tap Continue.
Select Bitwarden for the destination and then tap Continue.
Tap Continue in "Bitwarden".
The Bitwarden app will open. Tap Continue to confirm the import.
Once complete, a message confirming that your data was imported will appear.
CXP with Android devices
To import data using a mobile device with Android 14+:
Open the Bitwarden app.
Tap Settings.
Tap Vault.
Tap Import items.
Tap Import from another app.
Select the other CXP-compatible password manager app where your data is saved and tap Continue.
Depending on the app, choose which items to import. You may need to complete extra steps, like logging in or confirming you want to move data.
Once complete, a message confirming that your data was imported will appear.
note
At this time, importing Dashlane data via CXP isn't supported on Android.
To import data to your vault:
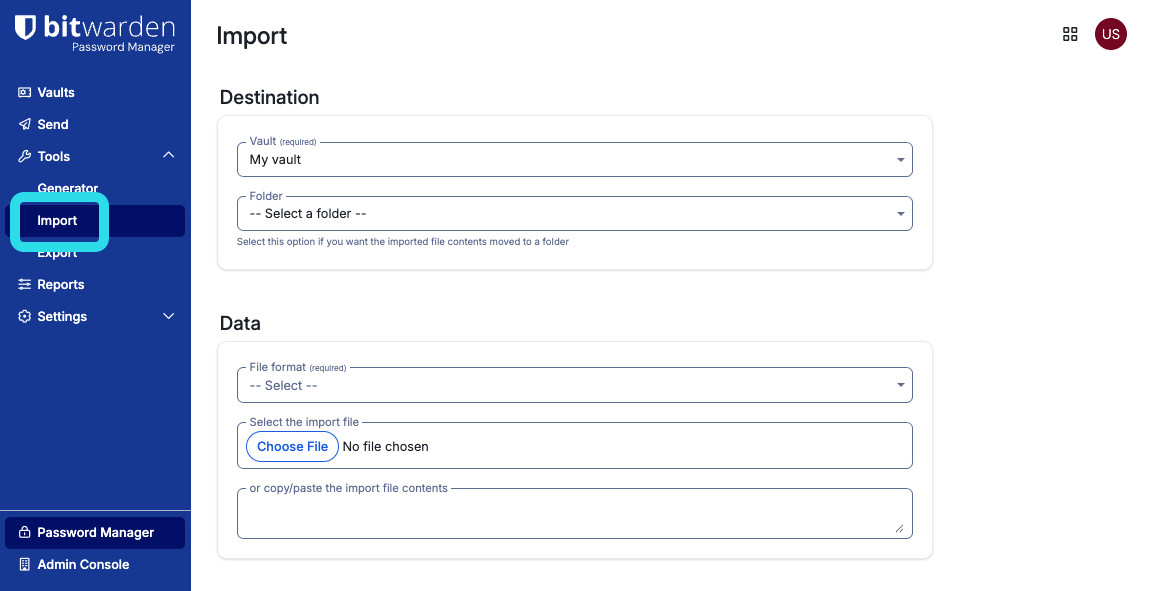
Select Import from the navigation menu.
From the Vault dropdown menu, select where to save the data:
To save data in your personal vault, select My vault. (Optional) Choose an existing Folder to organize the imported items.
note
If your data file contains folders from your previous password manager and you select a destination folder from the dropdown menu, the imported folders will be nested inside the folder you selected.
To save data in an organization's vault, select the organization's name. (Optional) Choose a Collection to organize the imported items and share with other members. (You can only choose a collection where you have can manage permission.)
Select Choose File and pick the file or copy and paste your file’s contents into the text box.
warning
Importing does not check for duplicates. If you import the same file more than once or import items already in your vault, duplicate items will be created.
Select Import data. If you are importing a password protected .json file, enter the password into the Confirm vault import window that appears.
After your data is imported, delete the exported data file from your computer. This will protect you in the event your computer is compromised. If you're importing to Bitwarden from another password manager or browser, you may also want to delete data from that tool.
To import data to your vault, use the following CLI command:
Bash
bw import <format> <path>
bw import requires a format (use bw import --formats to retrieve a list of formats) and a path, for example:
After your data is imported, delete the exported data file from your computer. This will protect you in the event your computer is compromised. If you're importing to Bitwarden from another password manager or browser, you may also want to delete data from that tool.
If an “Import error” message appears, no data was added to your vault. Fix the import file issue and try again.
Import directly from browser
The Bitwarden desktop app can import passwords from these browsers without a manually exported file:
Chrome
Edge (Windows and macOS only)
Opera
Brave
Vivaldi (Windows and macOS only)
Arc (macOS only)
This option is available on Windows and macOS desktop apps when installed from the downloads page, and on Linux when installed via AppImage. The direct import method does not work with desktop apps downloaded from app stores at this time.
note
The Import directly from browser option, specifically the process bitwarden_chromium_import_helper.exe, is known to be flagged by some EDR software, or on Windows by User Account Controls, when it attempts to pull credentials from browser storage:
As an administrator, you can proactively set the bitwarden_chromium_import_helper.exe to run as an administrator through UAC or your EDR software to prevent it from failing or issuing warnings when your users attempt the import.
As a user, if you're prompted to allow this app to make changes to your device, select Yes to proceed with the import.
To import your data from a browser:
Log into the Bitwarden desktop app.
Select File.
Select Import data.
From the Vault dropdown menu, select where to save the data:
Individual vault: Select My vault and (optional) choose a Folder to move the items.
Organization vault: Select the organization vault’s name and choose a Collection. (The Manage collection permission is required.)
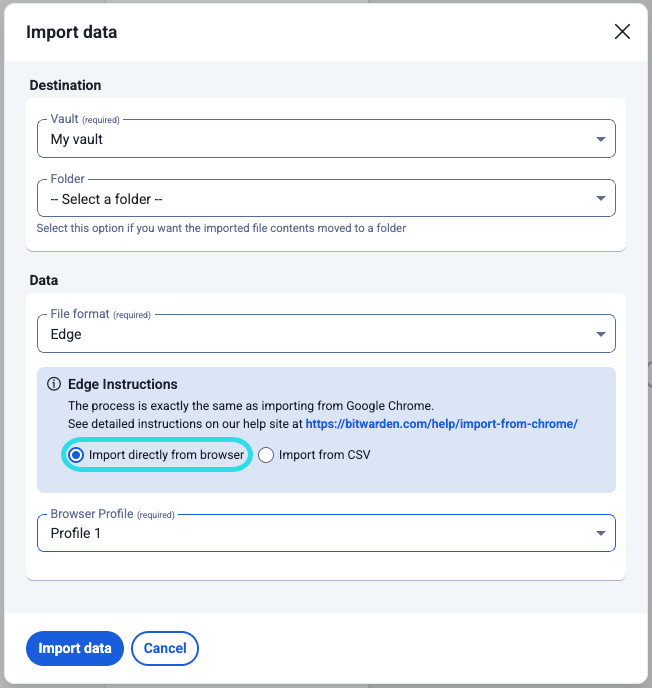
From the File format dropdown menu, select your browser. If that browser is compatible and installed on the same device, two options will appear below.
Select Import directly from browser:
Import directly from browser
Select the Browser Profile that contains your passwords.
Select Import.
Enter your computer password to confirm.
warning
Importing does not check for duplicates. If you import the same file more than once or import items already in your vault, duplicate items will be created.
Suggest changes to this page
How can we improve this page for you? For technical, billing, and product questions, please contact support