ユーザー管理
Bitwarden チームとエンタープライズ組織は、新しいユーザーを招待すると、ユーザーシートが自動的にスケールアップします。指定した数値を超えないように、席の上限を設定してスケーリングを制限することができます。また、手動で席を追加することも可能です。どのように席を追加するかに関わらず、使用しなくなった席を手動で削除する必要があります。
ユーザーシートの追加と削除は、将来の請求書の合計を調整します。席を追加すると、調整されたレートで即座にファイル上のお支払い方法が請求されます。そのため、請求周期(月/年)の残りの部分のみを支払うことになります。シートを削除すると、すでに支払ったシートが使用されていない時間についてクレジットが付与されるように、次回の請求が調整されます。
note
組甔所有者またはプロバイダーサービスユーザーだけが席を追加または削除できます。これは直接請求に影響を与えます。
あなたの組織がスケールアップできる座席の数値に制限を設定するには:
Bitwardenのウェブアプリにログインし、製品スイッチャーを使用して管理者コンソールを開きます( ):
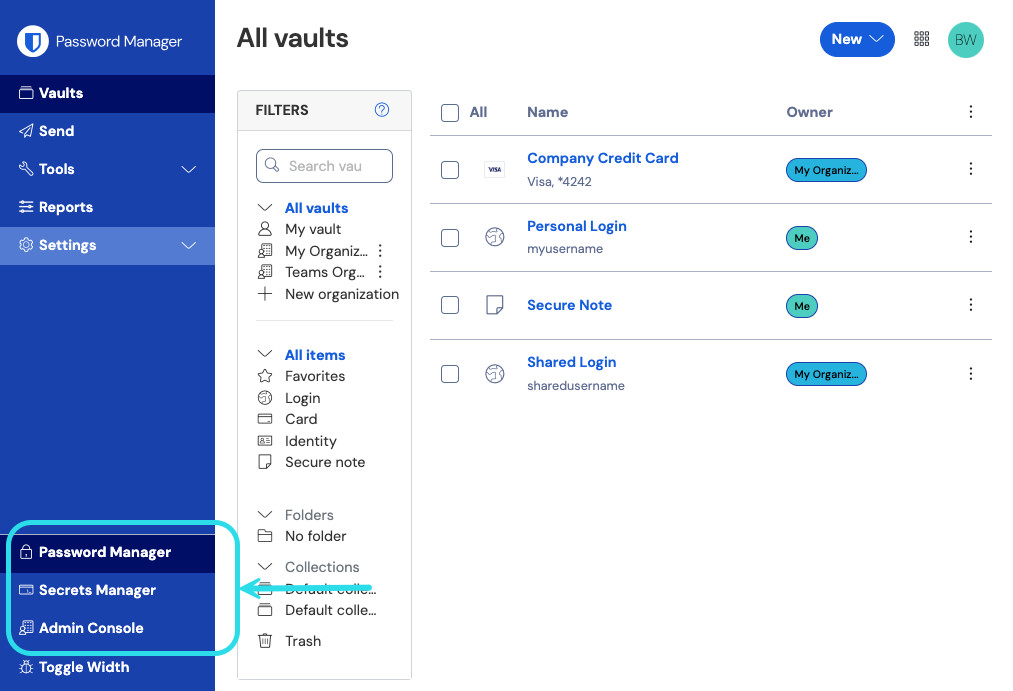
製品切り替えメニュー 請求書 → サブスクリプションに移動し、サブスクリプションの制限チェックボックスを確認してください:

席の制限を設定します 座席制限の入力欄に、座席制限を指定してください。
保存を選択してください。

note
指定された制限に達すると、制限を増やさない限り、新しいユーザーを招待することはできません。
あなたの組甔に席を手動で追加または削除するには:
Bitwardenのウェブアプリにログインし、製品スイッチャー( )を使用して管理者コンソールを開きます。
製品切り替えメニュー 請求書に移動 → サブスクリプション。
サブスクリプション席の入力欄で、マウスオーバー矢印を使用して席を追加または削除します。

シートを追加または削除する 保存を選択してください。

note
指定された席の上限を超えてサブスクリプションの席を増やす場合、希望のサブスクリプション席の数以上に席の上限を増やす必要があります。
あなたの組織のセキュリティを確保するために、Bitwardenは新しいメンバーをオンボーディングするための3ステッププロセスを適用します、招待 → 受け入れ → 確認。
note
このドキュメントは、ユーザーをBitwarden組織に追加するための手動オンボーディングフローをカバーしていますが、Bitwardenは自動的なユーザーとグループのプロビジョニングのための2つの方法を提供しています:
エンタープライズ組織は、Azure AD、Okta、OneLogin、およびJumpCloudのSCIM統合を使用できます。
チームとエンタープライズ組織は、Active Directory/LDAP、Azure AD、Google Workspace、Okta、およびOneLoginに対してディレクトリコネクタを使用できます。
tip
エンタープライズ組織の場合、ユーザーを招待する前にエンタープライズポリシーを設定することをお勧めします。これにより、組織への入会時にコンプライアンスが確保されます。
あなたの組甔にユーザーを招待するには:
Bitwardenのウェブアプリにログインし、製品スイッチャーを使用して管理者コンソールを開きます( ):
製品切り替えメニュー メンバーに移動し、 ユーザーを招待ボタンを選択します:

メンバーを招待する 招待ユーザーパネルで:
指定されたユーザーをあなたの組織に招待するために、保存をクリックしてください。

note
招待状は5日後に期限切れになります、その時点でユーザーは再度招待する必要があります。各ユーザーを選択し、 オプション メニューを使用して、招待を再送することで、ユーザーを一括で再招待します。

あなたがBitwardenを自己ホスト型で使用している場合、環境変数を使用して招待の有効期限を設定することができます。
招待されたユーザーは、Bitwardenから組織に参加するための招待を含むメールアドレスを受け取ります。メール内のリンクをクリックすると、Bitwardenのウェブアプリが開き、ユーザーはログインするか、アカウントを作成して招待を受け入れることができます。

招待を受け入れると、確認され次第、組織にアクセスできることが通知されます。さらに、組电のメンバーは、招待を受け入れるときにメールアドレスが自動的に確認されます。
あなたの組織への受け入れられた招待を確認するには:
Bitwardenのウェブアプリにログインし、製品スイッチャーを使用して管理者コンソールを開きます( ):
製品切り替えメニュー メンバーに移動してください。
任意の
承認済みユーザーを選択し、 オプションメニューを使用して 選択したものを確認します:
承認されたメンバーを確認してください 画面上のフィンガープリントフレーズが新しいメンバーが設定→アカウントで見つけるものと一致していることを確認してください。

サンプルフィンガープリントフレーズ


各フィンガープリントフレーズはそのアカウントに固有であり、ユーザーを安全に追加する際の最終的な監視層を確保します。それらが一致する場合は、送信を選択してください。
note
「フィンガープリントフレーズの確認を求めない」がオンになっている場合、ブラウザのキャッシュとクッキーをクリアすることでフィンガープリントフレーズの確認を再度有効にすることができます。
warning
マスターパスワードがない結果としての信頼できるデバイスとのSSOを持つアカウントについては、組織からの削除またはアクセス権の取り消しにより、以下の場合を除き、そのBitwardenアカウントへのすべてのアクセスが遮断されます:
あらかじめアカウント回復を使用して、マスターパスワードを割り当てます。
ユーザーは、アカウント回復ワークフローを完全に完了するために、アカウント回復後に少なくとも一度ログインします。
あなたの組織からユーザーを削除するには:
Bitwardenのウェブアプリにログインし、製品スイッチャー( )を使用して管理者コンソールを開きます。
製品切り替えメニュー メンバーに移動してください。
組織から削除したいユーザーを選択し、 オプションメニューを使用して 削除します:

tip
オフラインのデバイスは、組織の保管庫データを含む保管庫データの読み取り専用コピーをキャッシュします。これを悪意ある利用が予想される場合、メンバーがアクセスしていた資格情報は、彼らを組織から削除するときに更新するべきです。
あなたの組織からユーザーを削除しても、そのユーザーのBitwardenアカウントは削除されません。ユーザーが削除されると、組織や共有されたアイテムとコレクションにはアクセスできなくなりますが、既存のマスターパスワードを使用してBitwardenにログインし、個々の保管庫のアイテムには引き続きアクセスできます。
あなたの実装の詳細によりますが、以下の方法のいずれかを使用して、デプロビジョニングされたユーザーに属するBitwardenユーザーアカウントを削除することができるかもしれません:
あなたが自己ホスト型のBitwardenを使用している場合、認証された管理者はシステム管理者ポータルからアカウントを削除することができます。
あなたの会社が管理する
@yourcompany.comのメールアドレスを持つアカウントの場合、ログインせずに削除のワークフローを使用して、@yourcompany.comの受信トレイ内で削除を確認できます。詳細については、アカウントまたは組織を削除をご覧ください。
warning
マスターパスワードがない結果としての信頼できるデバイスとのSSOを持つアカウントについては、組織からの削除またはアクセス権の取り消しにより、以下の場合を除き、そのBitwardenアカウントへのすべてのアクセスが遮断されます:
あらかじめアカウント回復を使用して、マスターパスワードを割り当てます。
ユーザーは、アカウント回復ワークフローを完全に完了するために、アカウント回復後に少なくとも一度ログインします。
完全にメンバーを削除する代わりに、一時的に組甔とその保管庫のアイテムへのアクセスを取り消すこともできます。アクセスを取り消すには:
管理者コンソールで、メンバーに移動します。
アクセスを取り消したいメンバーを選択し、 オプションメニューを使用してアクセスを取り消す:

アクセスを取り消す

note
所有者のみ 他の所有者へのアクセスを取り消したり復元したりできます。
アクセスが取り消されたユーザーは、取り消し タブにリストされ、次の操作を行います:
組甔の保管庫アイテム、コレクションなどにはアクセスできません。
SSOを使用してログインする能力がない、または組織的なDuoを二段階ログインに使用することはできません。
組織のポリシーの対象ではありません。
ライセンス席を占有しないでください。
ユーザーへのアクセスを復元するには:
管理者コンソールで、メンバーに移動します。
取り消されたメンバー タブを開いてください。
アクセスを復元したいユーザーを選択し、 オプションメニューを使用してアクセスを復元します:

アクセスを復元する

ユーザーがアクセスを復元すると、再度招待 → 受け入れ → 確認のワークフローを経る必要はありません。
ユーザーの二要素認証ステータスは、メンバーページから表示できます。ユーザーが アイコンを持っている場合、そのユーザーのBitwardenアカウントには二段階ログインが有効になっています。
