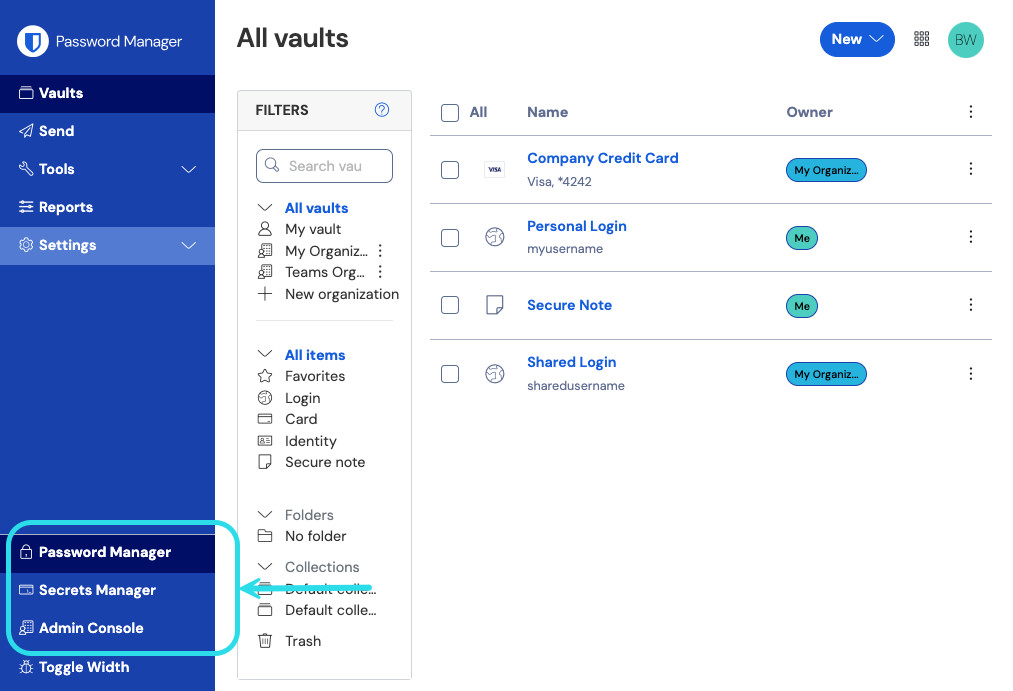
ライセンス組織またはプレミアム
Bitwardenのセルフホスティングは無料ですが、いくつかの機能は登録されたライセンスファイルでセルフホスティングインスタンスのロックを解除する必要があります。ライセンスファイルは、Bitwardenがホストするウェブアプリから、プレミアム個人サブスクリプションのアカウント、または組織の所有者のどちらかが取得できます。
個人ライセンスで作業する場合と組織ライセンスで作業する場合では、手順が異なります。
note
The procedures in this article assume that you have already started a paid subscription to Bitwarden. If you haven't, refer to About Bitwarden Plans and What Plan is Right for Me?
個人ライセンス
プレミアムサブスクリプションの個別ライセンスで作業する場合は、以下の手順に従ってください。クラウド Web ヴォールトとセルフホスト Web ヴォールトの両方で作業することになり、アカウントの電子メール アドレスは一致している必要があります。
個人ライセンスの取得
セルフホスティングサーバーでアカウントを作成したら、クラウドウェブアプリからライセンスを取得します:
ログインし、ナビゲーションから「設定」→「購読」を選択します。
ダウンロードライセンスボタンを選択します:

Download personal license

個人ライセンスの申請
次に、セルフホスティングのBitwardenサーバーにログインして、ダウンロードしたライセンスを適用します:
まだの方は、メールアドレスを確認してください。そのためにはSMTP関連の環境変数を設定しておく必要がある。
ナビゲーションから「設定」→「購読」を選択します。
ライセンスファイル]セクションで、[参照...]または[ファイルを選択]ボタンを選択し、ダウンロードしたライセンスファイルを追加します。
Submit(送信)ボタンを選択し、プレミアムライセンスを適用します。
個人ライセンスの更新
何らかの理由で個々のライセンスファイルを更新する必要が生じた場合、例えば有効期限が切れた場合などです:
ライセンスを再取得する 」の手順に従ってください。
ライセンスを再度適用する手順に従ってください。このとき、新しいライセンスを参照するボタンではなく、ライセンスを更新するボタンが表示されます。
団体ライセンス
FamiliesまたはEnterprise組織の組織ライセンスで作業する場合は、以下の手順に従ってください。ライセンスの取得、申請、更新を行うには、組織の所有者である必要があります。
組織ライセンスの取得
セルフホストサーバーで組織を開始する前に、クラウドウェブアプリから組織ライセンスを取得します。
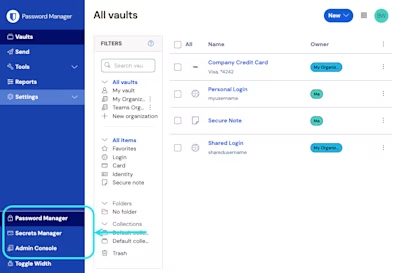
Bitwarden ウェブアプリで、プロダクトスイッチャーを使用して Admin Console を開きます:
製品-スイッチャー Billing→Subscriptionに移動します。
下にスクロールし、ダウンロードライセンスボタンを選択します。
プロンプトが表示されたら、セルフホスト型サーバーのインストールに使用したインストールIDを入力し、[Submit]を選択します。インストールIDがすぐにわからない場合は、
./bwdata/env/global.override.envから取得できます。
note
Make sure that the installation ID you retrieved from bitwarden.com/host uses the same data region as where your organization exists.
団体ライセンスの申請
セルフホスト型サーバーでライセンスを適用することは、セルフホスト型組織を作成する手段です。自前のウェブ保管庫から:
組織を追加]ボタンを選択して、新しい組織を開始します。
Browse...」または「Choose file」ボタンを選択し、ダウンロードしたライセンスファイルを追加して、「Submit」を選択します。
note
サポートされていないバージョンのエラーメッセージが表示された場合は、サーバーを更新してライセンスファイルのアップロードをやり直してください。サーバーを更新するには、bwdataディレクトリのバックアップを作成し、以下の手順に従ってください。
組織ライセンスの更新
組織は、たとえば、いくつかの異なるシナリオにおいて、セルフホストサーバーで使用されるライセンスファイルを更新する必要がある:
セルフホスト型組織にユーザーシートを追加するにはセルフホスト組織のシート数はライセンスによって決定されるため、シートを追加するには、まず関連するクラウド組織に追加し、次にセルフホスト組織で使用するライセンスを更新する必要があります。
ライセンスの更新時にセルフホスト型組織の運用を継続するには。更新日から60日以内に、セルフホスト型組織が無効になる前に、セルフホスト型サーバーのライセンスファイルを更新する必要があります。
セルフホスト組織のライセンスを更新するには2つの方法がありますが、ファミリーの組織は手動でのみ更新できます:
Automatic sync:
Eliminates the need for organization admins to manually re-upload licenses. Once setup, admins will only need to trigger a sync from the Organization → Billing when an update to the license used by the self-hosted organization is required.
Makes Families sponsorships possible for members of self-hosted organizations. Sync for these sponsorships will automatically occur per day.
Cannot be setup by organizations still in a free trial period.
To set up automatic sync:
Step 1: Enable cloud communication
note
このステップは、セルフホスト・インスタンスの設定ファイルにアクセスできる人が完了させる必要があります。
Configure your server to allow communication with Bitwarden cloud systems by setting the following lines in bwdata/env/global.override.env:
BashglobalSettings__enableCloudCommunication=true globalSettings__baseServiceUri__cloudRegion=US
If your cloud organization was created on EU servers, you'll need make the following changes to configure for communication with EU cloud servers:
Change the second of these lines to
globalSettings__baseServiceUri__cloudRegion=EU.Set the following 3 additional values:
BashglobalSettings__installation__identityUri=https://identity.bitwarden.eu globalSettings__installation__apiUri=https://api.bitwarden.eu globalSettings__pushRelayBaseUri=https://push.bitwarden.eu
note
globalSettings__baseServiceUri__cloudRegionの値は、インストールID&キーを取得する際に選択したデータ領域と一致する必要があります。
Once you have set these value, apply your change by running the ./bitwarden.sh rebuild command. Start your server again with the ./bitwarden.sh start command.
note
自動同期を有効にするには、ビットワーデンのクラウドシステムとの通信が必要です。ファイアウォールで送信トラフィックをブロックしている環境では、https://api.bitwarden.comまたは.euおよびhttps://identity.bitwarden.comまたは.eu を許可する必要があります。
Step 2: Retrieve billing sync token
Once cloud communication is enabled at the server-level, a sync token needs to be passed from the cloud organization that is associated with your self-hosted organization. To retrieve your sync token from the cloud web app:
Open the cloud Admin Console and navigate to Billing → Subscription.
In the self-hosting section, select Set up billing sync.
Enter your master password and select Generate token.
Copy the generated token.
Step 3: Apply billing sync token
To apply the billing sync token to your self-hosted organization:
Open the self-hosted Admin Console and navigate to Billing → Subscription.
In the License and billing management section, choose the Automatic sync option.
Select the Manage billing sync button.
Paste your generated Billing Sync Token and select Save.
note
Families for Enterpriseの同期は、最初の同期をトリガーすると、毎日1回行われます。このセクションの "Last sync "フィールドは、最初の同期をトリガーするまで "Never "と表示されます。
ライセンスアップデートの同期は、Sync licenseボタンを選択して常に手動で行う必要があります(詳細は次のセクションを参照)。
Step 4: Trigger sync
Trigger a sync once you've completed setup and each time you need to update your license. Sync for Familes for Enterprise will occur once daily. To trigger a sync:
Open the self-hosted Admin Console and navigate to Organization → Billing.
Select the Sync license button.
note
サポートされていないバージョンのエラーメッセージが表示された場合は、サーバーを更新してライセンスファイルのアップロードをやり直してください。サーバーを更新するには、bwdataディレクトリのバックアップを作成し、以下の手順に従ってください。