How to export your Bitwarden vault
- Blog
- How to export your Bitwarden vault
When you use Bitwarden, you can rest assured your vaults (and all of the items stored within) are always securely saved to the cloud. Because of that, your vaults are always up-to-date and in sync with the Bitwarden apps you use (be they on a desktop, a mobile device, or even the web).
Even though you can trust that your vaults are safely stored, it is also a good idea to always have an up-to-date, local backup on hand.
But how do you back up your Bitwarden vaults? Believe it or not, it's quite easy.
One thing to keep in mind, before you start the backup process, is that you should carefully consider where you want to store this backup. Rather than storing it on any computer that can be accessed by users other than yourself, it is better to save the backup file to a USB drive (or other removable device) and store it in a safe location, like a physical safe.
Bitwarden allows for your vaults to be exported as either CSV or JSON files. And with JSON exports, you also have the option of exporting an encrypted version of the vault.
What does that mean?
Simple. If you export your vault as a CSV or unencrypted JSON file, anyone who has access to the file can read it and view all of your passwords. If, on the other hand, you export as an encrypted JSON file, all password entries are encrypted, so even if someone has access to the file, all they'll see for password entries are encryption strings. So, if you can't store the file in a physical safe, exporting it as an encrypted JSON file is another highly recommended option.
With that said, let's find out how to export your Bitwarden vault.
You can export your vault from any Bitwarden client. For this demo, we’ll use the Bitwarden desktop app. You will also need a safe place to store the backup file. And that's all you need! Now, let's get to the backups.
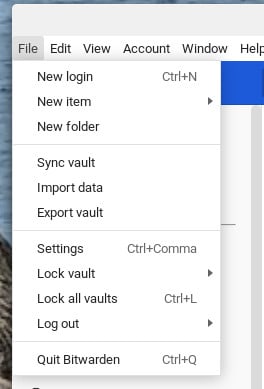
Before you run the export, it is highly recommended you do a quick sync to make sure your vault is successfully saved to your Bitwarden account. To do that, open the Bitwarden app and click File > Sync Vault (Figure 1).
Figure 1

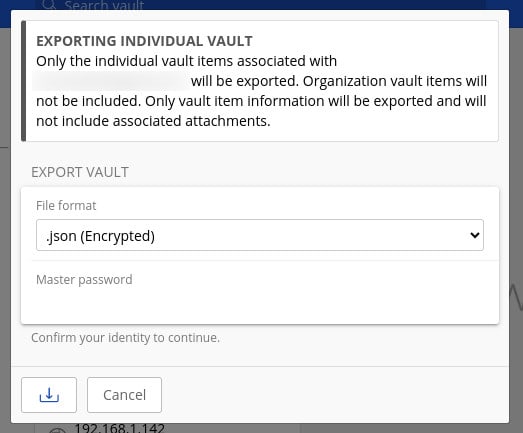
With the sync taken care of, click File > Export vault. In the resulting popup (Figure 2), select the type of file you want to house the backup (like the recommended encrypted JSON) from the File Format drop-down.
Figure 2

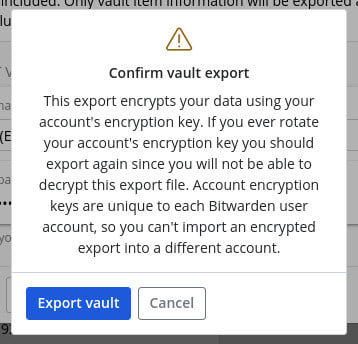
Type your Master Password, and click the Download button in the bottom left corner. When prompted (Figure 3), click Export vault and, if you're saving this to a USB drive, make sure to select the drive from your file manager, and click Save.
Figure 3

Once the file has downloaded, you can safely remove the USB drive, place it in your safe (or another secure location) and you're good to go. If you're saving the file on your computer, it is recommended to save it in a less-than-obvious (or hidden) folder.
Should you lose the credentials for your vault, you have a viable version that can then be imported. Just remember, if you add any new items or edit existing items in your vault post-export, you'll want to do another export so you have the latest information.
And that's all there is to exporting your Bitwarden vault. This is a great way to ensure you always have a working Bitwarden vault to access.
Ready to level up your security with Bitwarden? Sign up for a free Bitwarden account, or keep your team and company colleagues safe online by starting a 7-day free trial of our business plans.