- Blog
- How to use security keys with Bitwarden
Bitwarden is a powerful, open source password manager that is perfectly suitable for individuals and teams to bring about a much more secure password experience for everyone. Instead of memorizing simple passwords (that anyone can crack), or writing down complex passwords (that anyone can find and use), a password manager makes it possible for you to lock down very complicated passwords and access them with a single password.
But wait, you save all of those complicated passwords with a single, less complicated password? How does that prevent just anyone from gaining access to your Bitwarden database? For those that require stronger protection, Bitwarden also offers two-factor authentication (2FA) that allows you to use physical security keys (such as Solokeys and Yubikeys). Unlike using traditional 2FA (where a 6-digit key is sent to your smartphone via SMS or using a 2FA app on your smartphone), you authenticate using a physical key that is registered through the Bitwarden web-based interface. And since Bitwarden allows you to use multiple keys, you can register multiple keys so you're not limited to a single key that you must carry around with you everywhere.
When using physical keys as 2FA for Bitwarden with mobile devices, you will want to ensure you have the right connector such as USB-C, or an NFC-enabled key. You can also choose to enable a second 2FA method (such as the authenticator app or email verification) when you go to log in.
How do you use physical keys with Bitwarden? Let's walk you through the process now.
What you'll need
The only things you'll need to use physical keys are a Bitwarden account and an unused physical key. Once you have procured those two things, it's time to register your first key.
SECURITY TIP - Before you enable two-step login with any method, be sure to retain and safely store your recovery key.
How to register a physical key for Bitwarden
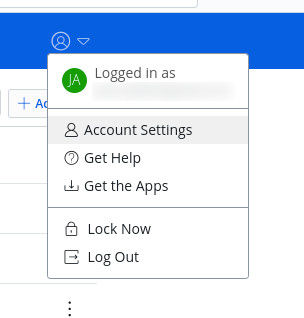
Open a web browser and log into your Bitwarden account. Once logged in, click the user icon near the top right and select Account Settings from the drop-down menu (Figure A).
On the Account Settings page, click Security, and then select the Two-step Login tab (Figure B).
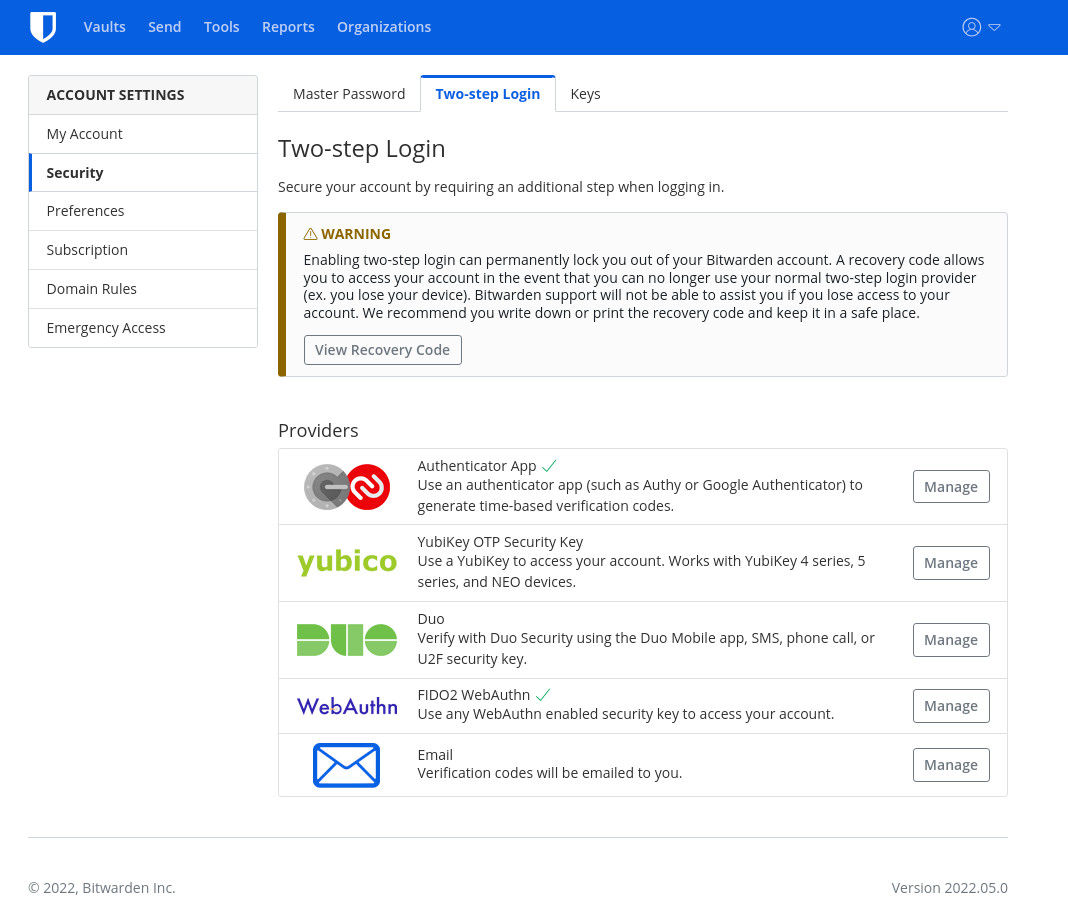
Click Manage associated with WebAuthn and you'll be prompted for your master password. Upon successful authentication, a popup window will appear, where you can register the new key (Figure C).
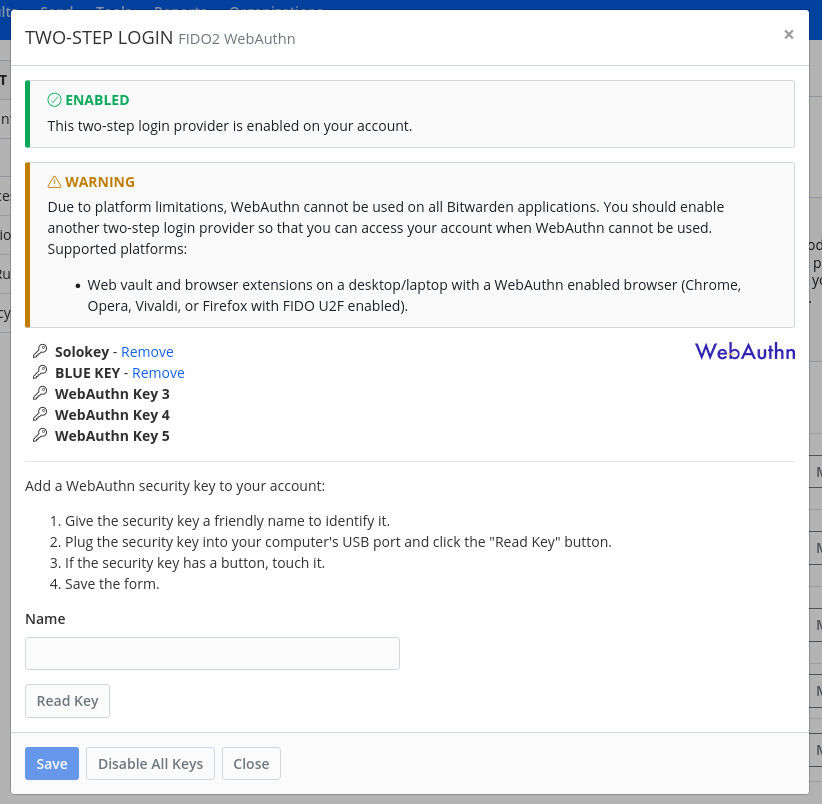
The physical key manager window
In this window, you can manage up to 5 different physical keys. To register your first key, plug the key into the device you're currently working on, type a name for the key in the Bitwarden 2FA login popup, and click Read Key.
Once the key has registered, it will appear in the list under the name you gave it. Close out the Settings window and you're ready to use your key to log in.
How to use your physical key
Log into Bitwarden and you'll then be prompted to Authenticate with WebAuthn (Figure D).
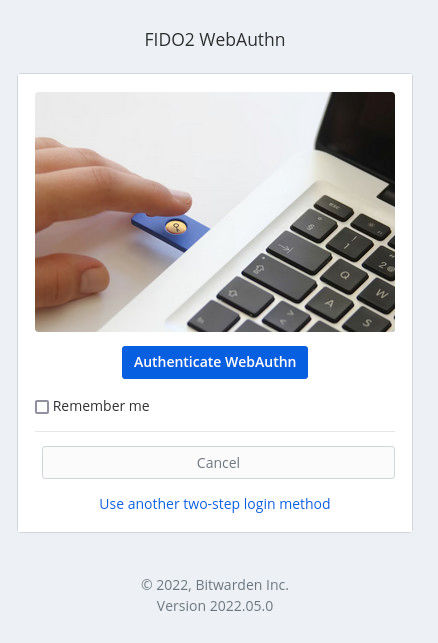
Logging into your Bitwarden account with WebAuthn
Insert one of the keys you registered and then activate the key. How you activate the key will depend on the type of key you use. For example, SoloKeys have two metal strips on either side, Touch those strips (simultaneously) with your thumb and forefinger to activate. You should then be logged into your Bitwarden account, where you can manage your passwords.
Adding a secondary method for authentication
You might find yourself without one of your Bitwarden keys (or using the mobile app, which doesn't work without NFC-enabled keys). In that case, you should set up a secondary 2FA option. One popular method is using a Two-Step Authenticator app, such as Google Authenticator or Authy, or open source options such as Aegis or Raivo OTP. With these apps, you go to log into your Bitwarden account and are prompted for a 6-digit code, which you retrieve from the authenticator app.
Some people, however, take the view that using an authenticator app defeats the purpose of using a security key, because it can become an open attack vector. This is often viewed as an extra strong take on security and having the additional security method can be helpful, should you find yourself without your physical key.
To add authenticator app 2FA, install the app to your phone, go back to your Bitwarden security settings > Two-step Login page, and select Authenticator App. You will be provided with a QR Code (Figure E) that you'll scan into your authenticator app.
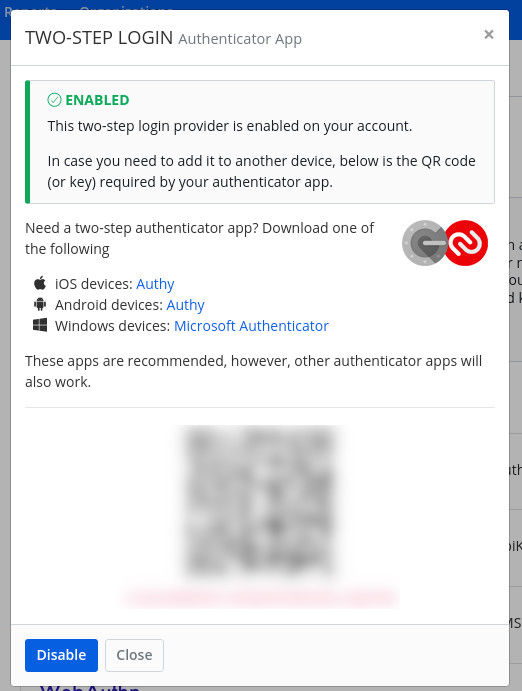
Figure E
Adding Bitwarden to an authenticator app for an alternate 2FA login
It's a good idea to set up both of these types of 2FA for your Bitwarden account. This way, you can still log into Bitwarden with either the physical key or your smartphone. And for those who use the Bitwarden mobile app, the Authenticator app method does work, so you can still get the added security from 2FA, even with the mobile app.
Visit the Bitwarden Help site for additional guidance on setting up two-step login via FIDO or YubiKey.
Interested in getting started with Bitwarden today? Sign up for a free individual account or start a free trial for your business.
Jack Wallen is an award-winning author and avid supporter of open source technologies. He has covered open source, Linux, security, and more for publications including TechRepublic, CNET, ZDNet, The New Stack, Tech Target and many others since the 1990s in addition to writing over 50 novels.