- Blog
- How to use the Bitwarden forwarded email alias generator
Bitwarden includes a very handy integration that you may not be aware of called forwarded email aliases. Essentially, they make it possible to forward any message received to your personal email. The aliases are private and never include anything in the address that would reveal any information about you.
But why would you need this?
Take, for instance, any time you sign up for an online service or subscription. When you do, you typically use your personal email address, which means that address could be sold by the original company and land you on numerous mailing lists or worse. In the name of all things privacy, you don't want that.
There are plenty of services that offer email aliases, such as SimpleLogin, Addy.io, Firefox Relay, Fastmail, DuckDuckGo, and Forward Email. In fact, Bitwarden supports each of those. Of course, you do have to already have an account with one of those services, and some of those services are free. You'll want to check into which service you prefer and sign up.
So, how do you make them work with Bitwarden? Let’s take a look.
What you'll need
To start, you'll need a Bitwarden account. This feature is available on the desktop app, web app, browser extension, and mobile app, but this blog will walk through using it with the desktop app. You'll also need the access API token for your email relay service. Which service you use will determine where the API token is located. It can be a bit tricky to locate this information. For example, with DuckDuckGo, here are the steps:
Go to the Autofill tab on the DuckDuckGo email protection page.
Open your web browser's developer tools.
Click the Generate Private Duck Address button and then go to the Network tab in the developer tools window.
Select the Addresses call for the API POST request.
Locate the API authorization item, which will look like authorization: Bearer <TOKEN> Where TOKEN is your authorization token.
Copy the authorization token, as you will need that later.
In Firefox Relay, you'll find the authorization token in Settings, which you access via your profile icon. In the Settings window, you'll see the API Key listed.
With those things in place, it's time to work with Bitwarden.
Setting up the forwarded email alias
Open Bitwarden and create a new vault entry. In the new entry setup window, click the Username Generator icon and, in the resulting window, click to expand the OPTIONS section.
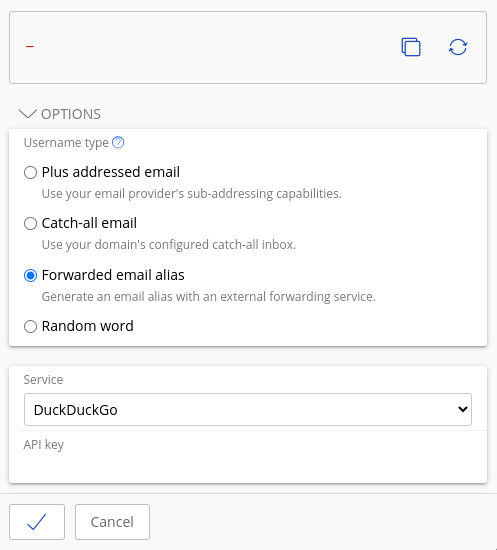
Under the Options section, you'll see the Forwarded Email Alias entry listed. Check that option and then select the service you wish to use from the Service drop-down (Figure 1).

Under API Access Token, paste the token you copied. Once Bitwarden verifies the access token, click the two circles with arrows at the top section of the window and a random relay email address will be chosen. Click the check mark to save the username. The username will now be populated with the forwarded email alias. Fill in the rest of the details for the vault entry and then save your work.
And there you have it! You've generated an email alias in Bitwarden that can then be used to sign up for services and accounts, without sacrificing the privacy of your personal email address.
Get started with Bitwarden
Interested in trying out the Bitwarden fowarded email alias generator? Quickly get started with a free Bitwarden account, or initiate a 7-day free trial of our business plans to keep your team and company colleagues safe online.