Setting up a releasing workflow for a .NET Library in 2024

- Blog
- Setting up a releasing workflow for a .NET Library in 2024
Building an app? Bitwarden Passwordless.dev is a developer friendly API that allows users to sign in using passkeys with biometrics. Get started for free and see for yourself.
Developing a library involves a lot of moving pieces, and not all of them are about writing code. In a modern software development environment, developers need to think about how they can build, test, and deploy our code, and how those processes can be automated to be as efficient as possible.
Earlier in this blog series, it was discussed about how to set up a GitHub Actions workflow to run tests for a .NET library, render the results in a human-readable way, collect code coverage metrics, and wire everything up to trigger on every commit in the repository. However, that covers only the "continuous integration" part of a would-be CI/CD pipeline.
To fully automate the library's development cycle developers also need to take care of the delivery flow — the parts of the pipeline related to the packaging of the library, deploying it to the NuGet package registry, keeping track of released versions and associated changes, and other such tasks. Conveniently, they can leverage the groundwork thats already laid out in a previous article.
In this article, let's take a look at how to set up a release workflow for a .NET library. While the exact approaches presented here might not apply to every project, they can serve as a good starting point for developers looking to automate their own library's release process.
Before diving into the details, let's briefly go over the state of the repository being worked on so far. As it stands, there is a single GitHub Actions workflow that runs on every push to the repository (including pull requests), and performs the following steps:
YAMLname: main
on:
push:
pull_request:
jobs:
test:
matrix:
os:
- windows-latest
- ubuntu-latest
- macos-latest
runs-on: ${{ matrix.os }}
permissions:
contents: read
steps:
- uses: actions/checkout@b4ffde65f46336ab88eb53be808477a3936bae11 # v4.1.1
- uses: actions/setup-dotnet@4d6c8fcf3c8f7a60068d26b594648e99df24cee3 # v4.0.0
with:
dotnet-version: |
8.0.x
6.0.x
- run: >
dotnet test
--configuration Release
--logger GitHubActions
--collect:"XPlat Code Coverage"
--
DataCollectionRunSettings.DataCollectors.DataCollector.Configuration.Format=opencover
- uses: codecov/codecov-action@eaaf4bedf32dbdc6b720b63067d99c4d77d6047d # v3.1.4
As you can see, the workflow is pretty straightforward. It checks out the repository, installs the .NET SDK, runs the tests against the specified runtimes, collects coverage data and uploads the corresponding reports to Codecov. To make sure the library works on all supported platforms, the above testing job is also configured to run simultaneously on Windows, Linux, and macOS. Finally, to render test results in an accessible way, you can use the GitHubActionsTestLogger package, which is a custom test logger for dotnet test that helps achieve exactly that.
To understand how to extend this workflow to include the release part of the pipeline, let's first take a look at what the release process for a .NET library typically looks like. As a refresher, here's the current repository structure:
Bash├── examples │ └── ... ├── src │ ├── Passwordless │ │ ├── ... │ │ └── Passwordless.csproj │ └── Passwordless.AspNetCore │ ├── ... │ └── Passwordless.AspNetCore.csproj ├── tests │ ├── Passwordless.Tests │ │ ├── ... │ │ └── Passwordless.Tests.csproj │ └── Passwordless.AspNetCore.Tests │ ├── ... │ └── Passwordless.AspNetCore.Tests.csproj ├── Passwordless.sln └── Directory.Build.props
The goal, as part of the release process, is to package the library projects (Passwordless.csproj and Passwordless.AspNetCore.csproj) into their respective NuGet packages. To do that, lets use the .NET CLI, which provides a convenient dotnet pack command that can be used to create NuGet packages from a project. Similarly to the dotnet test command, theres no need to specify the project file explicitly, and one can simply run dotnet pack from the root of the repository to package all projects in the solution:
Plain Text$ dotnet pack MSBuild version 17.8.3+195e7f5a3 for .NET Passwordless -> ./src/Passwordless/bin/Release/net6.0/Passwordless.dll Passwordless -> ./src/Passwordless/bin/Release/net7.0/Passwordless.dll Passwordless -> ./src/Passwordless/bin/Release/net462/Passwordless.dll Passwordless -> ./src/Passwordless/bin/Release/netstandard2.0/Passwordless.dll Passwordless.AspNetCore -> ./src/Passwordless.AspNetCore/bin/Release/net7.0/Passwordless.AspNetCore.dll Successfully created package './src/Passwordless/bin/Release/Passwordless.1.0.0.nupkg'. Successfully created package './src/Passwordless.AspNetCore/bin/Release/Passwordless.AspNetCore.1.0.0.nupkg'.
Also, as you can see from the above output, only the library projects are packaged, and the test projects are ignored. This is because the dotnet pack command only packages projects that have the <IsPackable> property set to true. You can use this property to control which projects should be packaged and which shouldn't, without changing the arguments passed to the command.
Now, having nupkg files ready, you can upload them to NuGet to make them available for consumption. To do that, use the dotnet nuget push command, which takes a nupkg file (or a glob pattern describing such files) as an argument, and uploads it to the specified NuGet feed. For example, to upload the packages to the official NuGet fee , run the following command:
Plain Text$ dotnet nuget push "**/*.nupkg" --source https://api.nuget.org/v3/index.json --api-key <API_KEY>
Here, the **/*.nupkg glob pattern is used to match all nupkg files in the current directory and its subdirectories, and the --source argument is used to specify the NuGet feed to upload the packages to. Finally, the --api-key argument specifies the API key to use for authentication. This key can be obtained from your account dashboard on the NuGet website, and is used to authenticate the user and authorize the upload operation.
With the above process in mind, let's think about how to integrate them into the existing GitHub Actions workflow.
To start off, let's extend the workflow with a new job, called pack. This job will be responsible for packaging the library projects into nupkg files. To do that, use the dotnet pack command, as discussed above:
YAMLname: main
on:
push:
pull_request:
jobs:
test:
# Test job remains unchanged, but is omitted for brevity
# ...
pack:
# Operating system doesn't matter here, but Ubuntu-based GitHub Actions
# runners are both the fastest and the cheapest.
runs-on: ubuntu-latest
permissions:
contents: read
steps:
# Clone the repository at current commit
- uses: actions/checkout@b4ffde65f46336ab88eb53be808477a3936bae11 # v4.1.1
# Install the .NET SDK
- uses: actions/setup-dotnet@4d6c8fcf3c8f7a60068d26b594648e99df24cee3 # v4.0.0
with:
dotnet-version: 8.0.x
# Create NuGet packages
- run: dotnet pack --configuration Release
As it stands, the above job will now execute together with the test job, on each push to the repository, and will create nupkg files from all packable projects in the solution. Just by performing the packaging step, you can verify that the library projects build successfully and produce valid packages, however there is not much use if you don't do anything with the produced files afterwards.
To improve on that, you can either extend this job further by adding a step that uploads the packages to NuGet, or alternatively, delegate that responsibility to a separate job. There are benefits and downsides to both approaches, but for this example let's go with the latter.
In order to be able to share the nupkg files between the pack job and our would-be deployment job, use the GitHub Actions artifacts feature. Artifacts allow us to expose specific files from a workflow to the outside world, and either download them using the web interface or from inside another job.
To create an artifact, use the actions/upload-artifact action, which takes a path to a file or directory (or a glob pattern) as an argument, and uploads it as a public resource. For example, to upload all nupkg files in the current directory, use the following command:
YAMLname: main
on:
push:
pull_request:
jobs:
test:
# Test job remains unchanged, but is omitted for brevity
# ...
pack:
runs-on: ubuntu-latest
permissions:
actions: write # this is required to upload artifacts
contents: read
steps:
- uses: actions/checkout@b4ffde65f46336ab88eb53be808477a3936bae11 # v4.1.1
- uses: actions/setup-dotnet@4d6c8fcf3c8f7a60068d26b594648e99df24cee3 # v4.0.0
with:
dotnet-version: 8.0.x
- run: dotnet pack --configuration Release
# Upload all nupkg files as an artifact blob
- uses: actions/upload-artifact@26f96dfa697d77e81fd5907df203aa23a56210a8 # v4.3.0
with:
name: packages
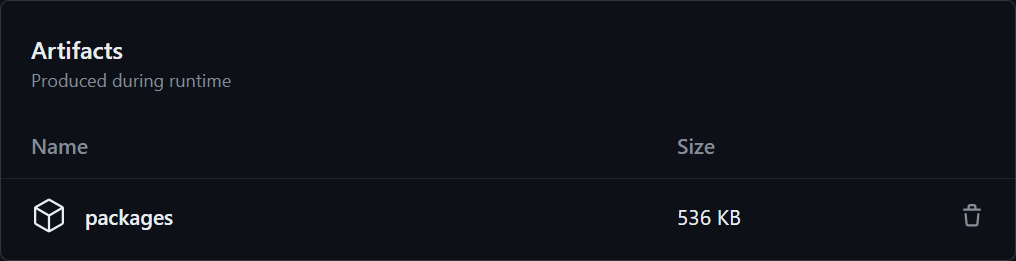
path: "**/*.nupkg"With this simple enhancement, the pack job will now produce an artifact called packages, which will contain all the `nupkg` files in the repository. The contents of the artifact can be inspected by downloading it from the "Artifacts" section in the workflow summary:
Now, to take care of the actual deployment process, create a new job, called deploy, which will be responsible for uploading the packages to NuGet. To do that, use the actions/download-artifact action to download the packages artifact, and then use the dotnet nuget push command to upload the packages to the NuGet registry:
YAML
name: main
on:
push:
pull_request:
jobs:
test:
# Test job remains unchanged, but is omitted for brevity
# ...
pack:
runs-on: ubuntu-latest
permissions:
actions: write
contents: read
steps:
- uses: actions/checkout@b4ffde65f46336ab88eb53be808477a3936bae11 # v4.1.1
- uses: actions/setup-dotnet@4d6c8fcf3c8f7a60068d26b594648e99df24cee3 # v4.0.0
with:
dotnet-version: 8.0.x
- run: dotnet pack --configuration Release
- uses: actions/upload-artifact@26f96dfa697d77e81fd5907df203aa23a56210a8 # v4.3.0
with:
name: packages
path: "**/*.nupkg"
deploy:
# Only run this job when a new tag is pushed to the repository
if: ${{ github.event_name == 'push' && github.ref_type == 'tag' }}
# We only want the deploy stage to run after both the test and pack stages
# have completed successfully.
needs:
- test
- pack
runs-on: ubuntu-latest
permissions:
actions: read
steps:
# Download the packages artifact
- uses: actions/download-artifact@6b208ae046db98c579e8a3aa621ab581ff575935 # v4.1.1
with:
name: packages
# Install the .NET SDK
- uses: actions/setup-dotnet@4d6c8fcf3c8f7a60068d26b594648e99df24cee3 # v4.0.0
with:
dotnet-version: 8.0.x
# Upload the packages to NuGet
- run: >
dotnet nuget push "**/*.nupkg"
--source https://api.nuget.org/v3/index.json
--api-key ${{ secrets.NUGET_API_KEY }}
As you can see, the deploy job is configured to run after both the test and pack jobs have completed successfully, which ensures that we don't accidentally publish a broken package update. It also runs only when a new tag is pushed to the repository, which is a common way to mark new releases in git-based projects.
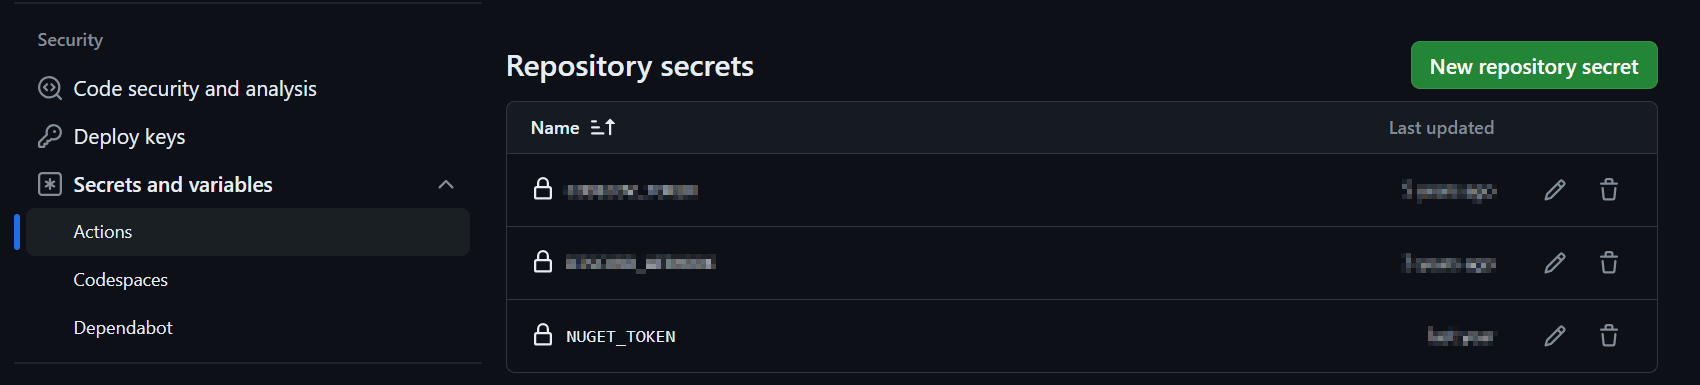
The command used to upload the packages to NuGet is the same as the one we discussed earlier, but with the addition of the special ${{ secrets.NUGET_API_KEY }} token in place of the actual API key. This token is a GitHub Actions secret, and is used to securely store sensitive information (such as API keys) in the repository. You can create a new secret by navigating to the "Settings" tab in your repository, and then clicking on "Secrets" in the sidebar.
Looking back, keeping the deploy job separate from the pack job might seem like an unnecessary complication, especially considering that it still needs to wait for the latter to complete. However, this separation yields a few benefits:
Having smaller, more focused jobs makes it simpler to understand and maintain the workflow. If you ever need to change the deployment process, we can easily do so without affecting the rest of the workflow.
GitHub Actions allows you to re-run individual jobs if they fail, instead of entire workflows. In this case, if the
deployjob fails, one can re-run it without building the artifacts or running the tests again.You can manage the permissions of the
deployjob separately from the rest of the workflow. This means that if thedeployjob ends up requiring acontents: writepermission (for example, to create a GitHub release), you can grant it without affecting the rest of the workflow.Uploading packages as artifacts can be useful even outside of sharing them between jobs. By exposing the output of the
packjob, you can easily inspect the produced packages, and verify their contents.
Overall, these benefits are subtle, but they can be more or less important depending on the specifics of your project.
With the above workflow in place, you can now package and deploy the library to NuGet on every new tag, but there's still one important aspect of the release process that hasn't been covered yet: versioning. In a typical .NET library, the version number is a crucial piece of information that helps consumers understand the significance of a particular release, and decide whether they should upgrade to it or not.
The most common approach to versioning is just to set the value of the <Version> project property whenever a new release is made. Although it requires manual intervention, it's simple and straightforward, gives you complete freedom over the versioning scheme, and keeps the repository free of any additional tooling or configuration.
XML<Project>
<PropertyGroup>
<!-- ... -->
<!-- Update this when making a new release -->
<Version>1.2.3</Version>
</PropertyGroup>
</Project>
Then, the typical release process would consist of the following steps:
Update the version number in the project file
Commit the change
Push the commit
Create a new tag (
1.2.3)Push the tag
Workflow runs and deploys the new version to NuGet
This approach works well for most projects, but it can be a bit error-prone. The biggest issue is that there are two places where the version number needs to be updated: the project file and the tag. It's easy to forget to update them both, or to make a mistake when doing so. Additionally, if you're planning to make releases often, the above versioning process can become somewhat tedious.
An alternative approach is to use the git tag as the only source of truth for the version number. This way, the version number is always in sync with the tag, and the release process becomes as simple as creating a new tag, without the need to update any code.
In such a setup, the version number in the project file is usually set to a placeholder value, such as 0.0.0-local, and is never updated. Instead, the actual version number is derived from the tag name, and is passed as a parameter during build. Here's how to do that in a GitHub Actions workflow:
YAMLname: main
on:
push:
pull_request:
jobs:
test:
# Test job remains unchanged, but is omitted for brevity
# ...
pack:
runs-on: ubuntu-latest
permissions:
actions: write
contents: read
steps:
- uses: actions/checkout@b4ffde65f46336ab88eb53be808477a3936bae11 # v4.1.1
- uses: actions/setup-dotnet@4d6c8fcf3c8f7a60068d26b594648e99df24cee3 # v4.0.0
with:
dotnet-version: 8.0.x
# Set the package version to the tag name (on release)
# or fall back to a placeholder value (on regular commits).
- run: >
dotnet pack
--configuration Release
-p:Version=${{ github.ref_name || '0.0.0-ci' }}
- uses: actions/upload-artifact@26f96dfa697d77e81fd5907df203aa23a56210a8 # v4.3.0
with:
name: packages
path: "**/*.nupkg"
deploy:
# Deploy job remains unchanged, but is omitted for brevity
# ...
In the above example, use the ${{ github.ref_name }} token to pass the tag name as the value of the Version property to the dotnet pack command. This way, the version number of the deployed packages will always match their tag name, and you don't need to update the project file manually.
With this setup, the release process is shortened to just the following few steps:
Create a new tag (
1.2.3)Push the tag
Workflow runs and deploys the new version to NuGet
One other thing that you may want to account in your versioning strategy is pre-releases. Pre-releases are versions that are not considered stable, and are typically used to distribute early versions of a library to a limited audience for testing. NuGet natively supports semantic versioning, so pre-releases are denoted by appending a hyphen (-) and an alphanumeric identifier to the version number, such as 1.2.3-alpha.
The existing setup works just as well for manually created pre-releases. You can simply push a tag with a pre-release version, and the workflow will deploy the corresponding package to NuGet.
However, you may also want to create and deploy pre-release packages automatically, for example, on every commit. Because there is no tag to derive the version number from, you'll need to come up with a different way to generate pre-release package versions. There are a few common approaches to solve this:
1. Approach 1: Use a placeholder version, such as 0.0.0 and just append the commit hash to it: 0.0.0-ci-7ca0ec0. This is the simplest approach, but it might make it harder for the consumer to understand the significance of a particular pre-release, or where it belongs in regard to existing, stable releases. Effectively, you'll end up having two separate versioning threads, which can be confusing.
2. Approach 2: Automatically generate a version by bumping the patch number of the latest stable release (git tag) and appending the commit hash to it: 1.2.4-ci-7ca0ec0. This approach is more consistent with the versioning scheme you'd already be using for stable releases, but it requires a bit more work to implement. A bigger downside, however, is that the versioning scheme is not semantic — your pre-release may involve breaking changes, but since only the patch number is ever bumped, the version would not reflect that.
3. Approach 3: Pull the latest stable package from NuGet and compare it to the package produced by the current workflow. Then, depending on the changes introduced in the public API, automatically evaluate whether to bump the major, minor, or patch number of the version. While this approach is the most accurate, it's also the most complex to implement, and it requires a lot of additional tooling and configuration.
Ultimately, because of the complexity involved, it was decided to go with the first option for the Passwordless .NET SDK, as it's very simple to implement and understand, and it's good enough for our needs. Here's how you can update the workflow form earlier to support automatic pre-releases with this approach:
YAMLname: main
on:
push:
pull_request:
jobs:
test:
# Test job remains unchanged, but is omitted for brevity
# ...
pack:
runs-on: ubuntu-latest
permissions:
actions: write
contents: read
steps:
- uses: actions/checkout@b4ffde65f46336ab88eb53be808477a3936bae11 # v4.1.1
- uses: actions/setup-dotnet@4d6c8fcf3c8f7a60068d26b594648e99df24cee3 # v4.0.0
with:
dotnet-version: 8.0.x
# Set the package version to the tag name (on release)
# or fall back to an auto-generated value (on regular commits).
- run: >
dotnet pack
--configuration Release
-p:Version=${{ (github.ref_type == 'tag' && github.ref_name) || format('0.0.0-ci-{0}', github.sha) }}
- uses: actions/upload-artifact@26f96dfa697d77e81fd5907df203aa23a56210a8 # v4.3.0
with:
name: packages
path: "**/*.nupkg"
# Deploy on all commits this time, not just tags
deploy:
needs:
- test
- pack
runs-on: ubuntu-latest
permissions:
actions: read
steps:
- uses: actions/download-artifact@6b208ae046db98c579e8a3aa621ab581ff575935 # v4.1.1
with:
name: packages
- uses: actions/setup-dotnet@4d6c8fcf3c8f7a60068d26b594648e99df24cee3 # v4.0.0
with:
dotnet-version: 8.0.x
- run: >
dotnet nuget push "**/*.nupkg"
--source https://api.nuget.org/v3/index.json
--api-key ${{ secrets.NUGET_API_KEY }}
Note that while you can publish packages frequently to NuGet.org, it's generally discouraged to deploy a new pre-release on each commit, as shown above. Instead, it's recommended that you use a private feed, such as GitHub Packages or MyGet, to do that. For example, here's how you can modify the deploy job to publish pre-releases to GitHub Packages:
YAMLname: main
on:
push:
pull_request:
jobs:
test:
# Test job remains unchanged, but is omitted for brevity
# ...
pack:
# Pack job remains unchanged, but is omitted for brevity
# ...
deploy:
needs:
- test
- pack
runs-on: ubuntu-latest
permissions:
actions: read
steps:
- uses: actions/download-artifact@6b208ae046db98c579e8a3aa621ab581ff575935 # v4.1.1
with:
name: packages
- uses: actions/setup-dotnet@4d6c8fcf3c8f7a60068d26b594648e99df24cee3 # v4.0.0
with:
dotnet-version: 8.0.x
# Deploy to NuGet.org (only tagged releases)
- if: ${{ github.ref_type == 'tag' }}
run: >
dotnet nuget push "**/*.nupkg"
--source https://api.nuget.org/v3/index.json
--api-key ${{ secrets.NUGET_API_KEY }}
# Deploy to GitHub Packages (all commits and releases)
- run: >
dotnet nuget push "**/*.nupkg"
--source https://nuget.pkg.github.com/${{ github.repository_owner }}/index.json
--api-key ${{ secrets.GITHUB_TOKEN }}
Another important aspect of the release process is keeping track of the changes introduced in each version of the library. This is typically done using a changelog, which is a file that contains a list of all changes made to the library, organized by version.
There are a few different strategies for maintaining a changelog. Most library projects opt for a manually maintained changelog file (typically CHANGELOG.md in the repository root), which is updated by the maintainers whenever a new release is made. The changelog can follow a well-established format, such as Keep a Changelog, which provides a set of conventions for how to structure the file, and makes it easier for certain tools to parse them (such as Dependabot).
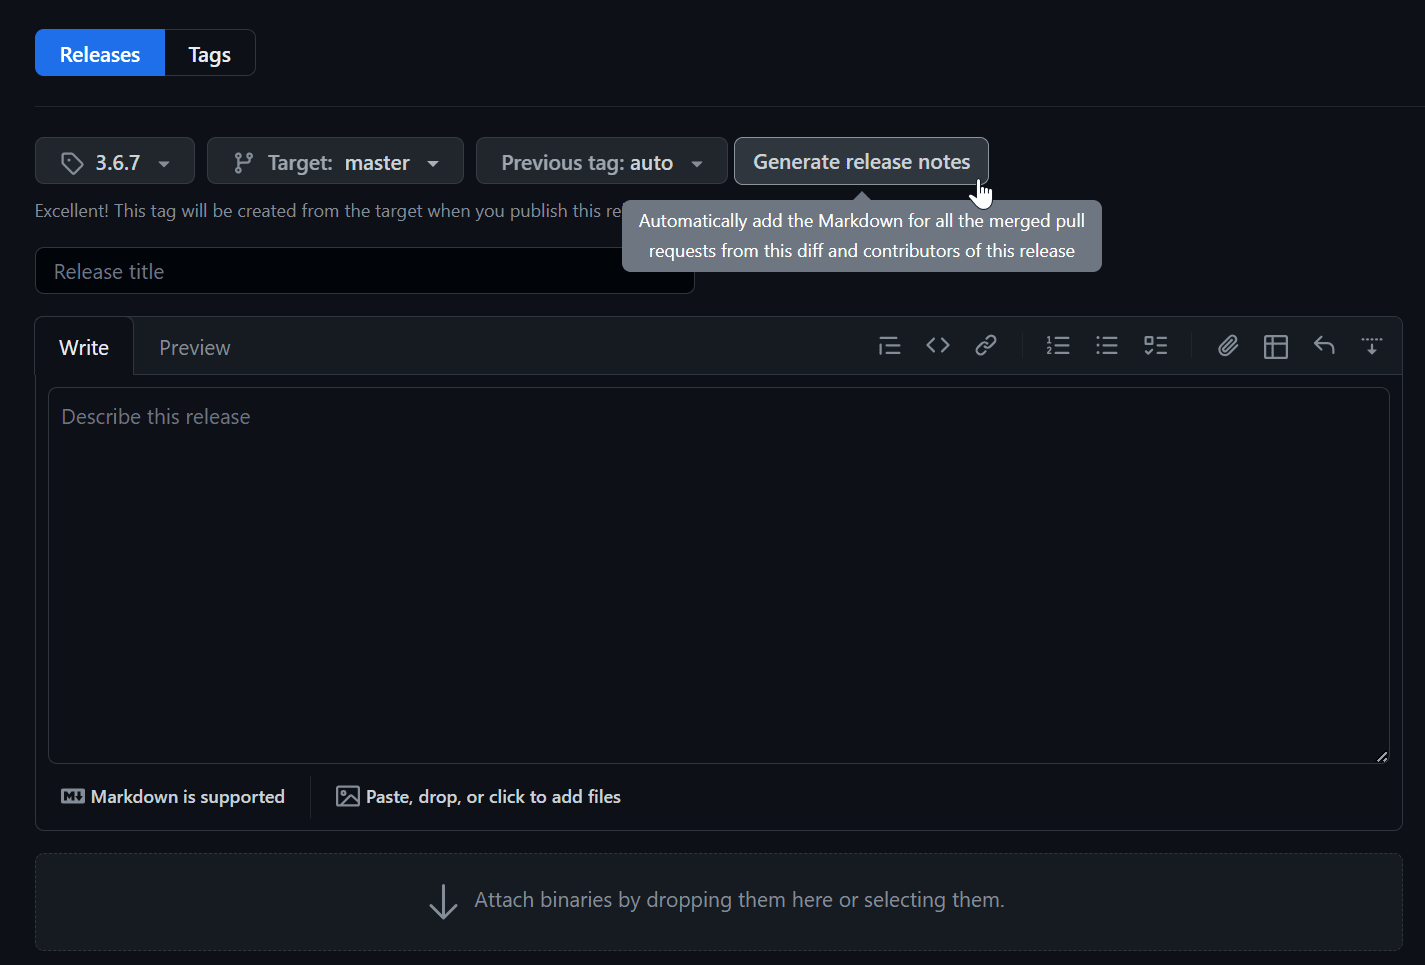
However, maintaining a changelog manually can be a bit tedious. Luckily, GitHub can make things a bit simpler with the help of the automatically generated release notes. This feature allows you to automatically generate a changelog based on the pull requests merged since the last release, and include it inside the description when you make a new release. It does require that all meaningful changes are applied via pull requests (even if working alone) and that you make a GitHub release for each new version, but the automation benefits are well worth it.
With the workflow that is now in place, there are no changes necessary in order to get the changelog generation working. All you have to do is draft a new release on GitHub, assign it to a tag you pushed earlier, and click "Generate release notes".
You can also choose to let GitHub create the tag for you as you publish the release, which will trigger the deploy job just as if you had pushed the tag manually. With this approach, your release process will look like this:
Publish a new release on GitHub (with auto-generated release notes)
Workflow runs and deploys the new version to NuGet
In case you prefer to avoid the manual step of creating a new release through the GitHub web interface, you can automate that part of the process as well. To create a new release programmatically you can use the GitHub API, or more conveniently, the GitHub CLI. When doing either, you have the option to include auto-generated release notes in the description of the release — for example, below is how you can achieve that with the GitHub CLI:
Bash$ gh release create 1.2.3 --repo my/repo --generate-notes
The `gh` tool is already pre-installed on GitHub-hosted runners, so to incorporate this into our workflow, we only need to update our deploy job with one extra step.
YAML
name: main
on:
push:
pull_request:
jobs:
test:
# Test job remains unchanged, but is omitted for brevity
# ...
pack:
# Pack job remains unchanged, but is omitted for brevity
# ...
deploy:
needs:
- test
- pack
runs-on: ubuntu-latest
permissions:
actions: read
contents: write # this is required to create releases
steps:
- uses: actions/download-artifact@6b208ae046db98c579e8a3aa621ab581ff575935 # v4.1.1
with:
name: packages
- uses: actions/setup-dotnet@4d6c8fcf3c8f7a60068d26b594648e99df24cee3 # v4.0.0
with:
dotnet-version: 8.0.x
- if: ${{ github.ref_type == 'tag' }}
run: >
dotnet nuget push "**/*.nupkg"
--source https://api.nuget.org/v3/index.json
--api-key ${{ secrets.NUGET_API_KEY }}
- run: >
dotnet nuget push "**/*.nupkg"
--source https://nuget.pkg.github.com/${{ github.repository_owner }}/index.json
--api-key ${{ secrets.GITHUB_TOKEN }}
# Create a GitHub release with auto-generated release notes, and upload the packages as assets
- if: ${{ github.ref_type == 'tag' }}
run: >
gh release create ${{ github.ref_name }}
$(find . -type f -wholename **/*.nupkg -exec echo {} \; | tr '\n' ' ')
--repo ${{ github.event.repository.full_name }}
--title ${{ github.ref_name }}
--generate-notes
--verify-tag
Here, the step we added is responsible for creating a new release on GitHub, and uploading the packages as assets. The --generate-notes flag tells the gh tool to automatically generate release notes based on the pull requests merged since the last release, and include them in the description of the release. The --verify-tag flag tells the tool to verify that the tag exists before creating the release, as a sanity check to ensure that the release is being created for a valid tag.
Finally, with this setup, the release process is optimized to the following few steps:
Push a new tag (
1.2.3)Workflow runs, creates a release and deploys the new version to NuGet
This article covered how to set up a release workflow for a .NET library, based on what was learned from the Bitwarden teams experience building the Passwordless .NET SDK. The existing GitHub Actions workflow has been extended to include a new job that packages the library projects into nupkg files, and another job that uploads the packages to NuGet. Additionally, a few other topics are covered such as how to handle versioning and pre-releases, and how to automate the generation of release notes.
Are you a developer looking to add passkey authentication using biometrics to your applications? Quickly get started with a free Passwordless.dev account, or visit Passwordless.dev to learn more about the offering.
Still have questions? Check out our community pages and share your thoughts and questions there.